Mac
How the Vision Pro caught my attention despite my skepticism
It looks like Apple did it again!
No, I haven’t purchased one and do not intend to do so anytime soon, but this is the first device of this type I would ever buy. Confused? Go with me for a moment. It will make sense, I promise.

Even though the Vision Pro isn’t the only Augmented Reality device out there, I always felt like all the others were made for gamers. It might be because of how they are promoted. I don’t know. But since I’m not a gamer, buying a virtual or augmented reality headset simply never crossed my mind.
It’s a computer
From the very beginning, Apple was clearly positioning the Vision Pro as a consumer device, but because of my gaming perspective and the price tag, it was never an item on my radar. Then I watched Casey’s video about it, and something clicked for me. This is definitely not for gamers. It’s not a gimmick for geeks, either. It’s for everyday people who prefer or have to use computers to do their work.
I’m still putting off buying a US$4,000 (after taxes and some accessories) first-gen gadget, but that video sent me on an endless journey on YouTube. Many people are showing it being used as a computer with several giant screens. In other words, one can use it to “work on a computer” with practically no desk space. All that real-world usage really spoke to me. Well, “real-world” might not be the best choice to describe it, but I think you got it.
I could never use the iPad as a Mac replacement. Despite Apple spending a fortune trying to promote it as a computer, it is not a computer. The restrictions imposed by iPadOS make my work much more challenging. The Vision Pro, on the other hand, can be connected to a real computer, and that makes all the difference.
So many Apps
However, a computer is only as good as the software library available for it. And as far as I could understand, everything that works on macOS will work when a Mac is connected. Which kind of brings us back to the old debate about touchscreen Macs, but I digress.
Then there’s visionOS, which has the potential to unleash a wave of new ideas, much like iOS did a long time ago.
And, of course, the younger generation that prefers mobile devices was not left out. Thanks to Scott Forstall’s advocating for the App Store on the iPhone, there’s now an abundance of Apps already available for Vision Pro.
Why not buy it?
Well, first there’s that price tag. Then there is the fact that it is a first-generation device. I waited until the 3GS to buy my first iPhone, and in hindsight, I should probably have waited until the 4S.
There is one thing for sure: Apple won again. I can clearly see myself purchasing a smaller, lighter, and much, much cheaper version of the Vision Pro in the future. And if it makes the Apple stock go up enough, I might be able to score one for free by selling some of what I own to buy its “4S” generation.
Is your computer truly yours?
It is remarkable how contemporary technology is built around the loss of control over our devices. In contrast, the Apple IIe, which is considerably older, is so open to experimentation and modifications.
One or two years ago, I wanted to try ChromeOS Flex and decided to install it on my old MacBook Air 2012. I enjoyed the process of installing it and had fun with the OS. Now I needed macOS back on the computer to be able to use it on the Apple IIe restoration project, but when it came time to reinstall macOS, things didn’t go well at all.
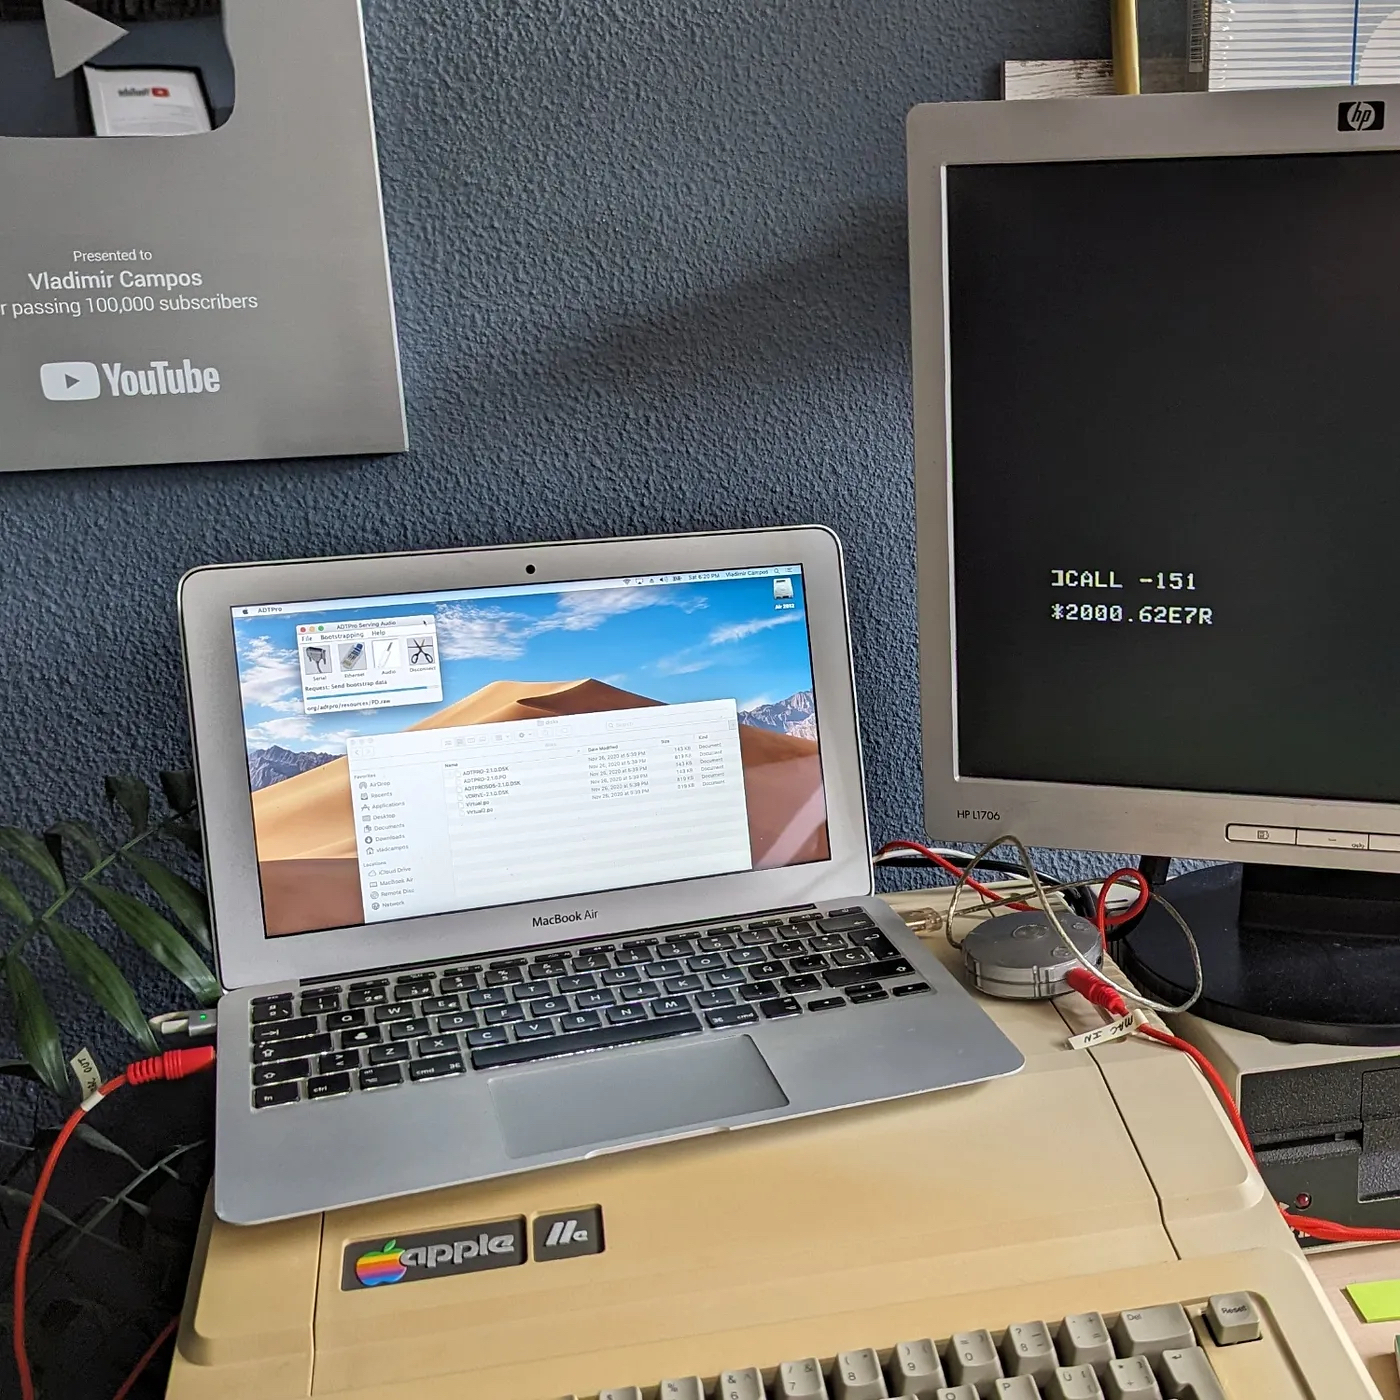
macOS Recovery
If you start macOS holding command + r, you’ll be prompted to reinstall the OS. I was counting on this when I decided to try ChromeOS Flex. Anyway, I tried all possible variations of the command + r command, but at some point, near the end of the process, a glitch would always stop the installation.
Another issue was that the countdown to the end of the process would display a huge negative number, which would also result in an error message. I searched online and found out that the negative number was related to a network problem, but my network and internet connection were working perfectly well.
I also tried to reinstall macOS by holding the option key. This is how you tell the Mac to search for external drives when it starts up. However, I was unsuccessful there as well. I was probably doing something wrong because the system would never recognize the installation disk on connected drives. It is also possible that the bootable part of the disc was damaged during the installation of Chrome OS Flex. I don’t know. Regardless of the reason, I am puzzled as to why I was encountering such difficulty. After all, it is my computer.
Downloading macOS
We are provided with downloads of older versions of the operating system, but I challenge you to try installing it on a computer with a dead or new hard drive. One must go through numerous workarounds to make it work. By the way, during my saga I also learned that Apple does not provide any official instructions for how to install an older OS over a newer one. Even worse, it tells us that we cannot do it.
Carbon Copy Cloner
After jumping from one website to another and failing miserably, I remembered that my wife didn’t get rid of her old Mac mini from 2012. My new plan was to clone the Mini hard drive using Carbon Copy Cloner. Of course, I had problems there as well. First, I had to find an older version of the program that worked with macOS Mojave. Next, the mini drive is 500 GB, and the Air’s is 64 GB.
To make a square fit into the circle, I created a new admin user (me) on my wife’s computer, and on Carbon Copy Cloner, I unselected her user and all the non-essential files before cloning. Of course, figuring out what are the essential files is easier said than done. After lot of trial and error, I was successful, but I would not be able to use this same strategy on a slightly newer Mac. My 2012 machine has a removable SSD, and I happen to have the correct USB enclosure. In other words, I could remove it from my computer and connect it to my wife’s Mini via USB.
My computer finally started, but the OS was extremely slow. It would take several minutes to boot, and the mouse was jumping all around the screen every time I moved it. Thinking that some issue could have occurred during the cloning process, I repeated it several times, but I had no success.
It was time to take a break, like I usually do when I get stuck.
The next day, I remembered that macOS has an Activity Monitor. I ran it, but to my surprise, the total CPU load was over 90%, even though no software or process was taking more than 5% of the CPU time. Back to Google!
Resetting PRAM and SMC
In the end, there wasn’t anything wrong with the cloning process. The issue was with the different computers. Using Carbon Copy Cloner to make a copy is like transplanting a brain from one person to another. The new brain in my MacBook Air was from a Mac Mini. To put it simply, I had to help it adjust to its new body.
I don’t have enough technical knowledge to explain this, but there’s a way to reset basic macOS configurations called PRAM and SMC. I reset them, and the OS started working like a charm.
Finally!
Anyway, all this was just another step in my Apple IIe restoration project. I could finally install the ADTPro software on the MacBook Air to copy old software to the IIe. Of course, I hit a new brick wall. But this is a story for another day.
The intricate task of replacing the iBook G4 hard disk.
First, I connected the new disk to the Mac via USB, and with the help of Carbon Copy Cloner, I created a perfect copy of the old disk, which was still inside the computer. Then, after many layers and countless screws (pictures below), I finally reached the disk and replaced it.
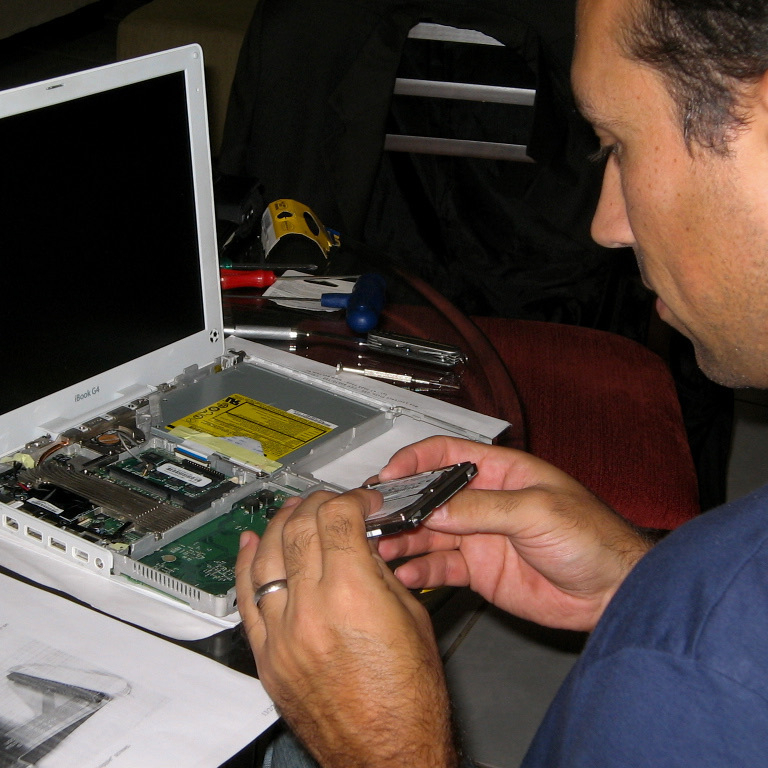
The operation took me a good number of hours, and despite the flawless boot, the sleep and wake function was not working when closing and opening the lid. It took me a while to figure it out, but the culprit was one of the magnets not being correctly aligned. Here we go again. To get there, I had to take off some layers and screws one more time.

The next problem on the list was the Wi-Fi not working. I checked the Airport Extreme card, which is easily accessible below the keyboard, and everything looked fine. After several hours of troubleshooting the operating system without any success, I realized how late it was and went to bed.