Apple
- All my notes and documents.
- My website.
- Every pin I add to Google Maps, like trip ideas or cool places here in Porto, is also added to Obsidian using the Maps Plugin.
- Like already mentioned, all the materials I use to create my videos are in subfolders inside my Static Containers folder, which I usually access from the computer file system.
- And there’s also more elaborated things, like the Scrivener files of all my books.
- Apple ID
- iPhone and iPod touch models with iOS 14.5 or later
- iPad models with iPadOS 14.5 or later
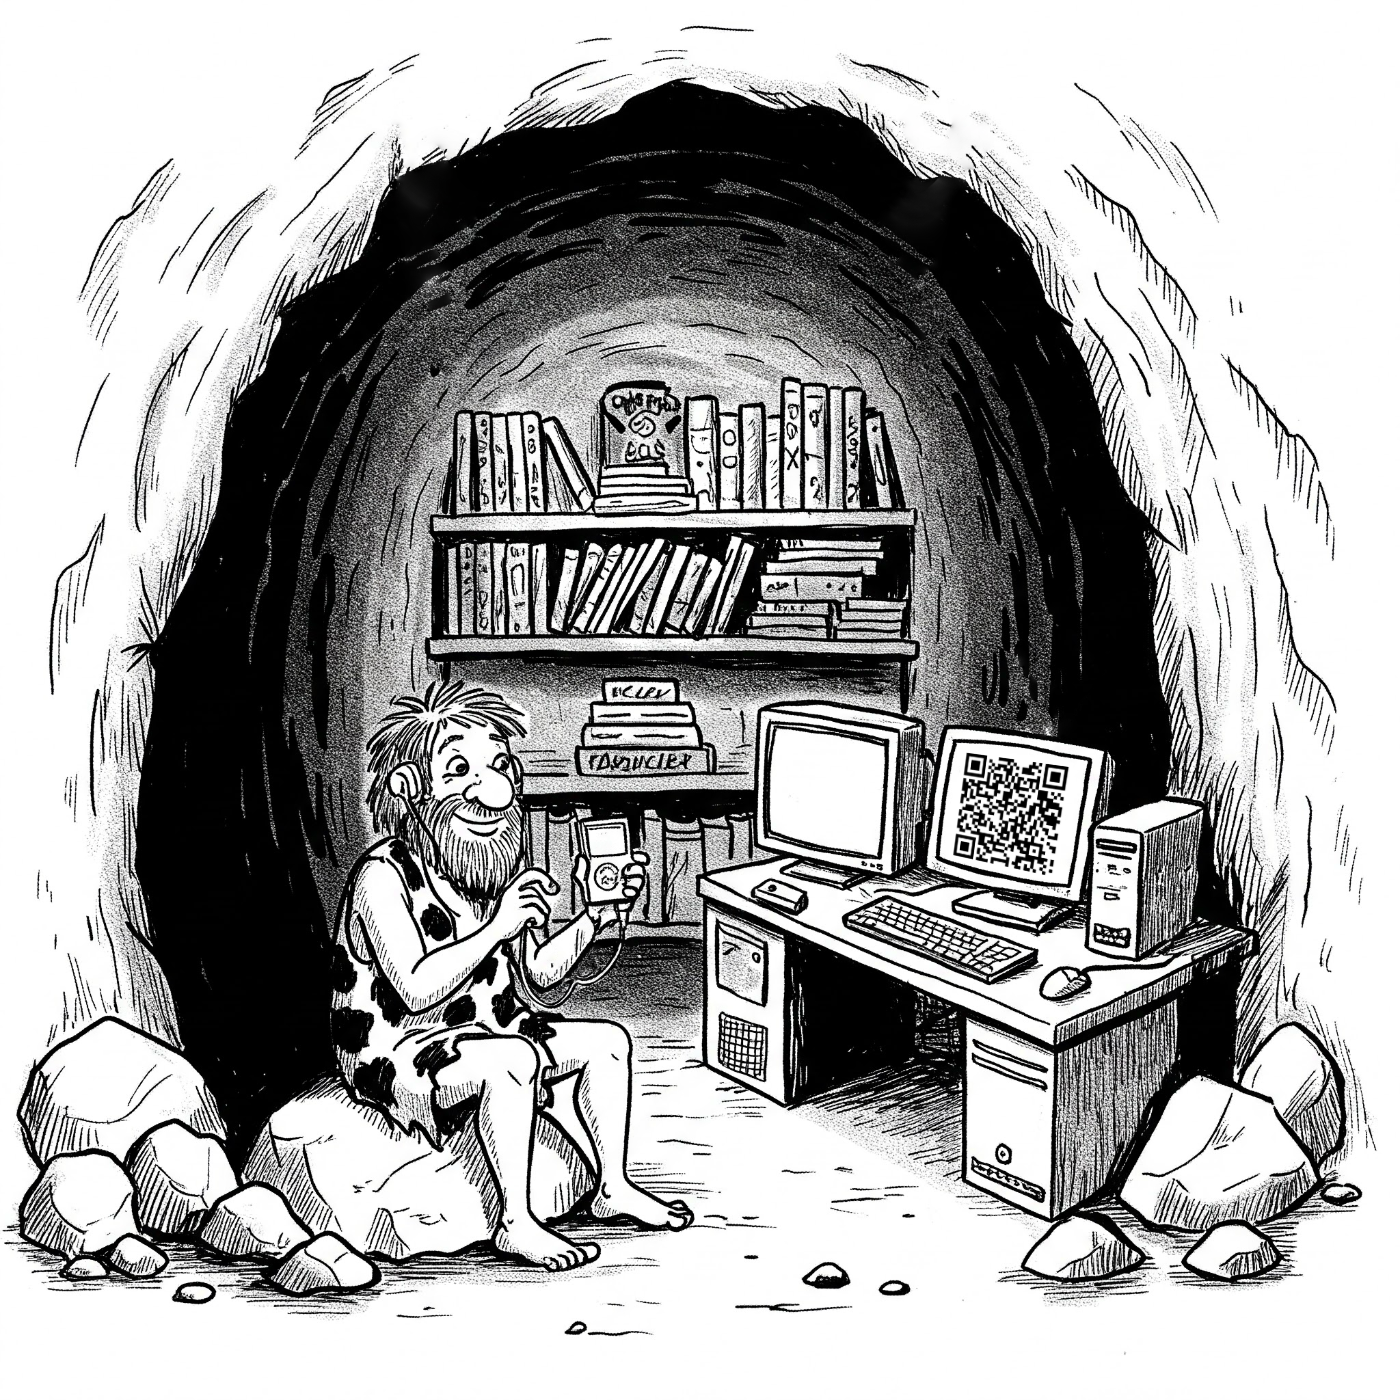
Digital Cave Man
I love the conveniences of the modern world and have no intention of giving them up. However, the price we are paying to host our entire lives on the cloud is too high. And I don’t mean it in monetary terms, although it can certainly become expensive.
Because I was already using Syncthing to synchronize my Obsidian vault between two computers and a smartphone, and at the same time, keeping two automatic backups of everything — in different parts of the city — I had an idea.
What if I moved all my files to my vault in Obsidian?
I’m already doing that with several resources, like my video production folder, which I’ve been keeping in Obsidian as a Static Container for a long time. The vault is already being synchronized by Syncthing-Fork, so everything else I move there will be sent to all my devices. And talking about that, my Timeline System is also playing a big role, as its simple structure is easy to understand and use. Storing and finding information is super intuitive.
I don’t know when exactly the idea of hosting everything myself was born. In hindsight, I’d say that the fact that I still use my old iPod 5 Gen to listen to the music I own, might have played a big role in my plan. Then came Obsidian and the realization that all our files are kept locally and can be 100% managed by us, the users and owners.
Maybe that’s what inspired me to create a local backup of my photos, which are now stored in folders using a basic and simple structure that almost any computer and any regular app can read.
The video above shows the photos being sent to Apple Photos, but I’m not doing that anymore. I now keep them in folders because it’s a way to have them accessible no matter the computer or technology being used. However, there’s another reason. Almost accidentally, I found out that the Apple Photos database was about twice the size of the photos kept in folders.
That not only uses unnecessary storage on your computer but will cost you much more if you are synchronizing and backing up your beloved memories on iCloud. In both cases, Apple is in control and making more money because you are purchasing a Mac with more storage space and subscribing to a larger iCloud plan. I talk more about this in the video below.
Back to my master plan. Here’s what I have already set as local folders in Obsidian:
My photos are half way there. Like I demonstrated in the video below, they are synchronized with both of my computers and backed up locally with everything else.
But the final plan is that one day, when storage in our mobile phones is on par with computers, I will move the photos folder to my Obsidian vault. For now, only pictures I’m using in my journal — which is also in Obsidian — or any other notes are already being moved there.
And there’s more. Currently, I’m experimenting with the idea of keeping my passwords’ database in the Timeline folder in Obsidian. I chose KeePass after searching for a solution that would give me control of the database. I’m not sure if I’ll stick to it, but as a proof of concept, it’s working much better than I was expecting (there’s a video about it coming up soon).
Again, because the vault is already being synchronized and the database with the passwords is there, I’m able to log in to it from any computer or mobile device, by linking it to the corresponding KeePass app. Moreover, because of my backup scheme, I’ll always have a backup of the passwords on two different hard disks that are in two distinct buildings.
The Digital Caveman
This is certainly not for everyone, but my plan is to move every single digital file to my “cloud” system, which is not even a cloud. It’s just information being synchronized and backed up on multiple computers that are in different places. I call it the Digital Caveman project because it has this “handmade” feel to it and because everything is kept in “my cave”.
Android's Answer to AirTags is here. Time to switch!
Wait, there’s another competitor. Who would have believed that Tile would pull such a card from its sleeve?
If you go to the AirTag page on Apple’s website, and check the ‘System Requirements and Compatibility’ information, you’ll see this:
As you are already aware, I am a Pixel user, so it was the third item in the list above which convinced me to become an early adopter of AirTags. And even though Apple says the company designed the AirTag to track items, not people or pets, my plan was to do exactly that: attach it to my dog’s collar.
When I asked Drance about parents using AirTags to track their small children (such as during an outing at an amusement park) or pets (we know you’re up to something shady, Fluffy) she was quick to stress that the company designed the AirTag to track items, not people or pets. If parents would like to safely track their young children, she suggests an Apple Watch with Family Setup might be a better choice. (source)
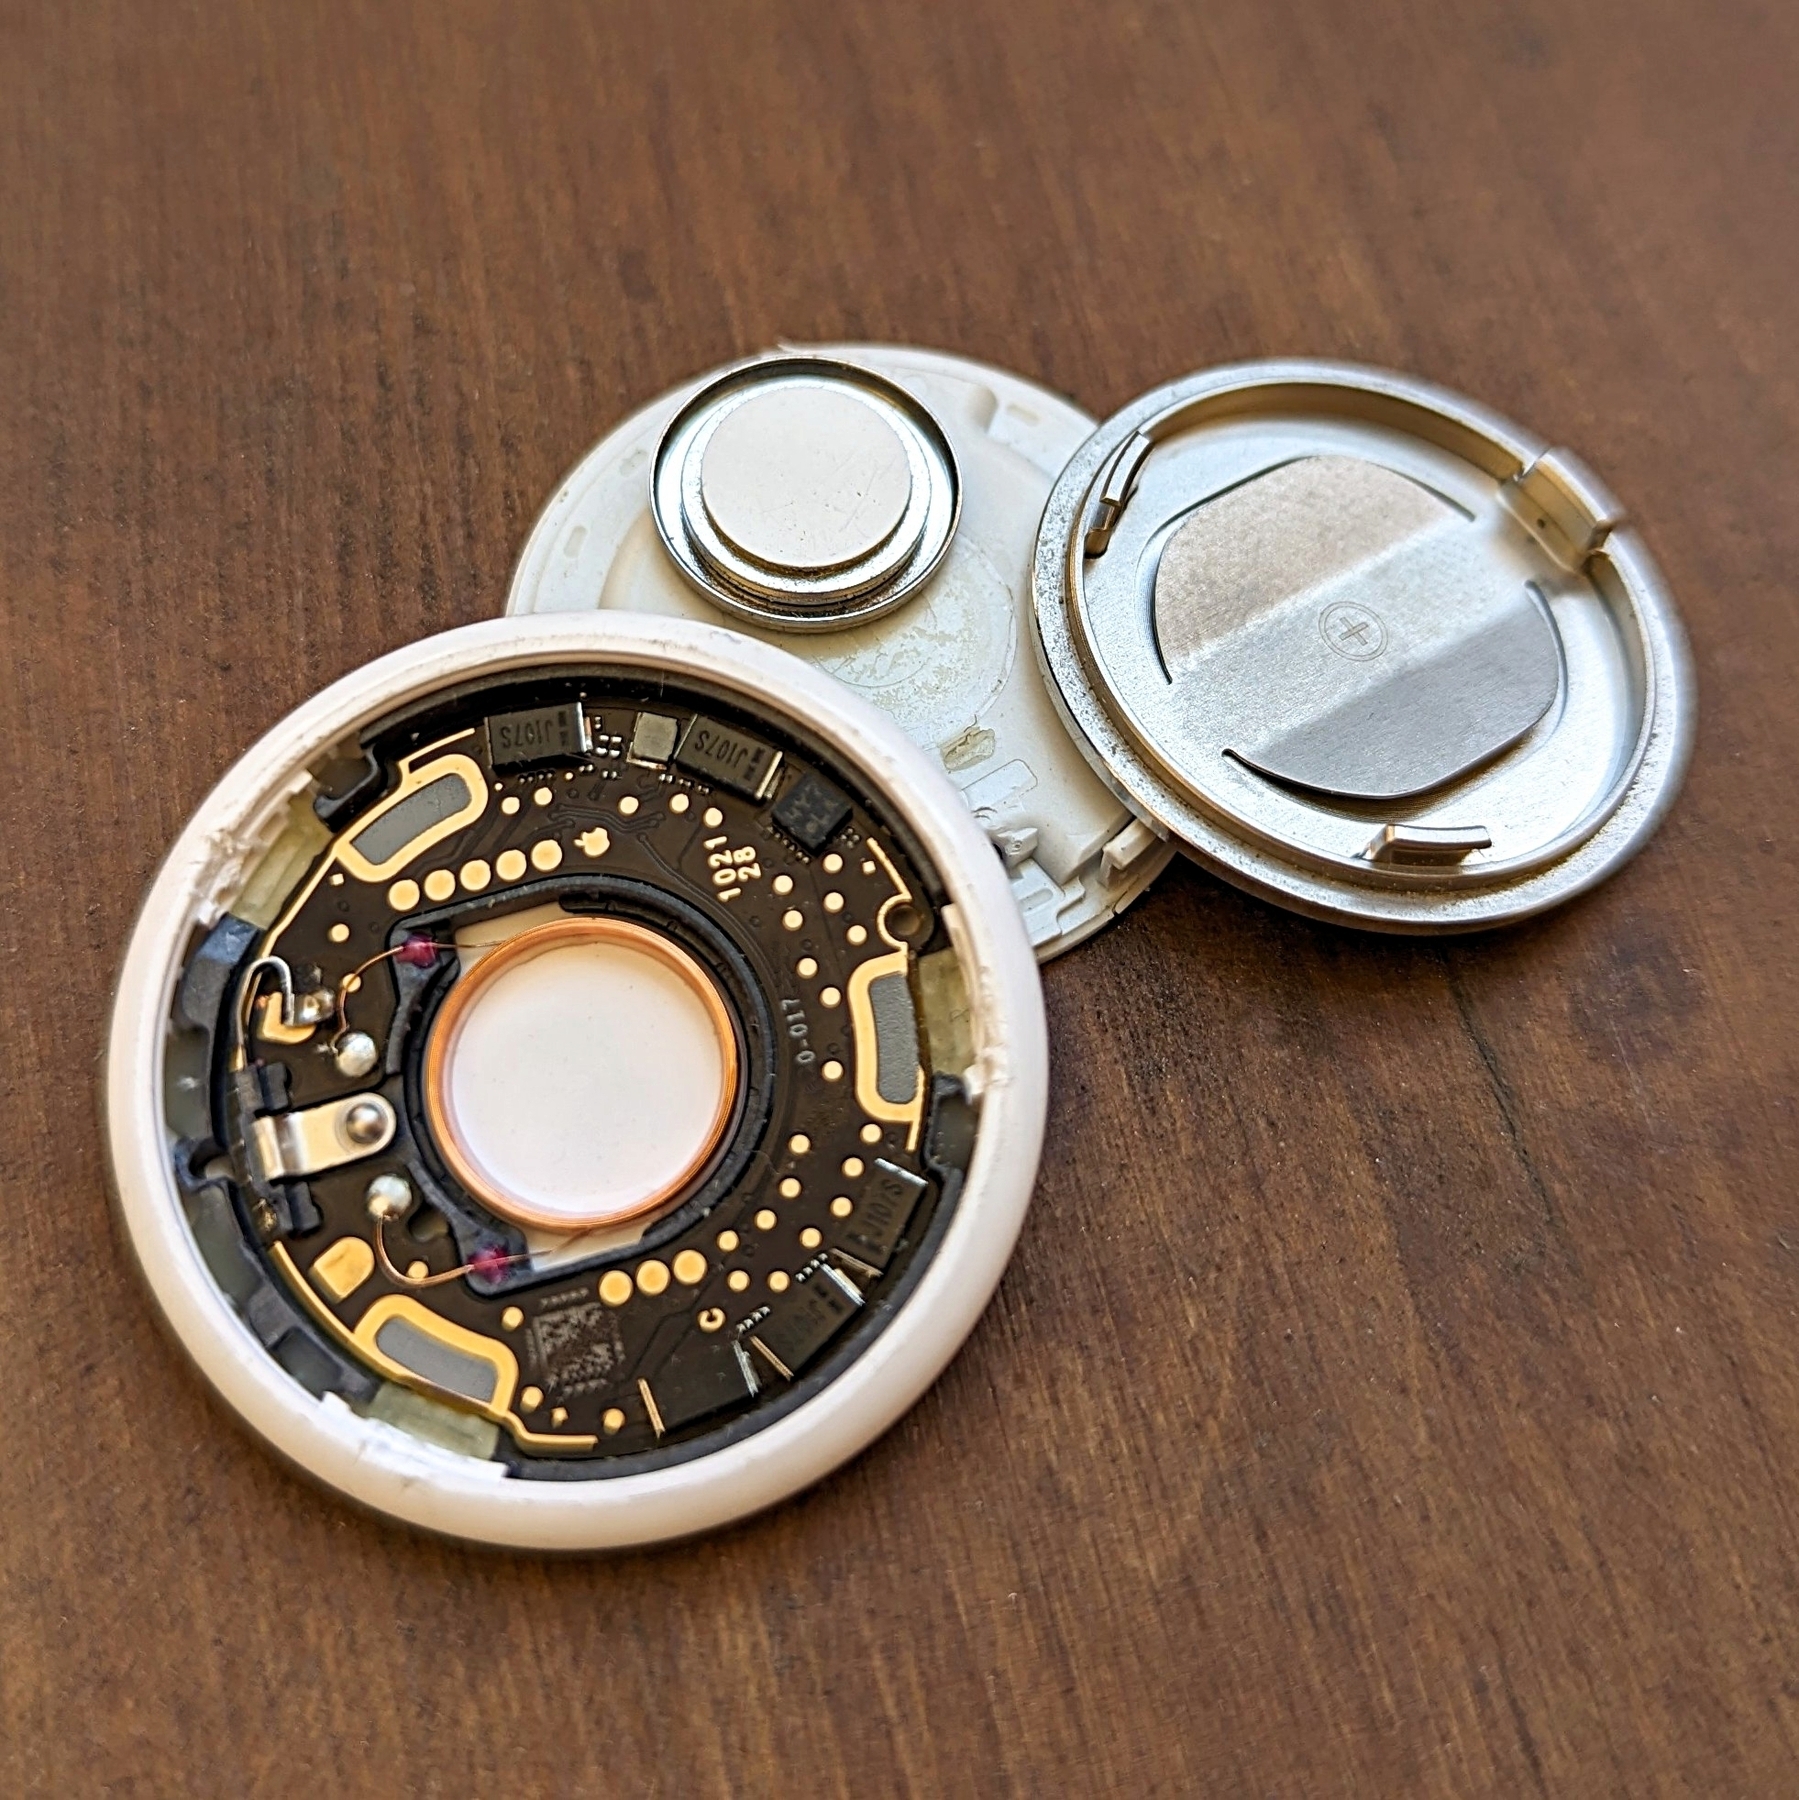
My dog’s AirTag.
When the AirTag arrived, I linked it to my iPad and immediately started testing it. Every time my wife would go on a longer walk with our dog, I would track them simultaneously on Google Maps and Apple ‘Find My’ app. To accomplish that, my wife would leave her iPhone behind and bring an Android that was sharing its GPS location with me.
If she were to take the iPhone with her, it would be too easy for the tracker. My goal was to learn how the AirTag would perform when having to rely on other people’s iPhones to do its thing. And to my surprise, the first tests went very well. The ‘Find My’ app would show our dog about a block behind the Android GPS, which was expected and quite accurate if you ask me.
However, on walks very early in the morning, I would completely lose track of my dog on the map. The same would happen in large and spacious parks. All of that was also expected, but sometimes it was not working, even when she had people around her. Android users, for sure. But that’s not all the problems I experienced.
I don’t know why, but the AirTag alarm would go off every other day even when my dog and the iPad were close to each other. Extremely close to each other. I would be sitting on the couch reading something on the iPad, with my dog lying down by my side.
That, I could never fix. Even after unpairing, resetting and parring again several times. It was so frustrating that I ended up destroying the AirTag.
Relax, it’s not what you are thinking.
We had a trip coming up, and our dog would stay with a pet sitter, which meant she would inevitably face the ‘away from owner’ alarm. As for the ‘AirTag traveling with you’ alert, that’s okay, as I definitely would tell her about the tracker.
Long story short, I decided to disable the speaker altogether. This would also solve the issue of the alarm going off when it wasn’t supposed to. Taking great care, as always, I went about the delicate process. Unfortunately, after the surgery, the AirTag refused to pair.
That was the perfect timing to try the Chipolo Spot, which is compatible with Apple’s network. I bought a 4-pack, and guess what? One of them also had the alarm going off almost every day. Maybe it’s an issue with the iPad parring, since it never happened to the ones paired with my wife’s iPhone.
Google’s Answer to AirTags
A few days ago, I received an email from Google with the news I was expecting for a while and decided to buy new takers.
Find My Device network is coming soon.
You’ll get a notification on your Android devices when this feature is turned on in 3 days. Until then, you can opt out of the network through Find My Device on the web. After the feature is on, you can manage device participation anytime through Find My Device settings on the device.
How it works.
Devices in the network use Bluetooth to scan for nearby items. If other devices detect your items, they’ll securely send the locations where the items were detected to Find My Device. Your Android devices will do the same to help others find their offline items when detected nearby.
Of course, there are plenty of people using iPhones here in Europe, but Apple’s phone is only more popular than Androids in the United States. Android has a much larger market share worldwide, which translates to a potentially wider network for Google’s ‘Find My Device’ service when compared to Apple’s ‘Find My’. And that’s something I’m excited to test.
I purchased another 4-pack, but this time it was a Chipolo Point. Point? What about the Spot? Okay, time to decode Chipolo product line.
Be careful
Similar to Tile, Chipolo already had its own network and was selling distinct tracker models, namely ONE, which resembles a circle, and Card, which resembles, well, a card.
When Apple introduced the AirTags, Chipolo released compatible trackers, which they branded as Chipolo Spot. And now there’s the Chipolo Point, compatible with Google’s ‘Find My Device’ service. The appearance and form factor of the models are the same, no matter the network. So, always pay attention to what you are buying.
The Future
Life360, the parent company of Tile, which has never mentioned trackers compatible with Apple’s or Google’s networks, recently announced a GPS-Bluetooth network in partnership with Hubble Network. What‽
I’ve never heard of this network or the technology before, and am interested to see how a satellite can pick up a Bluetooth signal from Earth. But besides the brief post and hyperbolic video published on Life360 website, there is not much said about anything else. And I have so many questions. For example, will there be a subscription? Will current Tiles work on this network? Does the satellite constellation currently exist?
In any case, I’ll be taking good care of the Tile trackers I still have in my drawer.
Modern travel is weird.
Half of my backpack has clothes. The other half has filming gear and dongles. A bunch of them. Thank you, Apple.
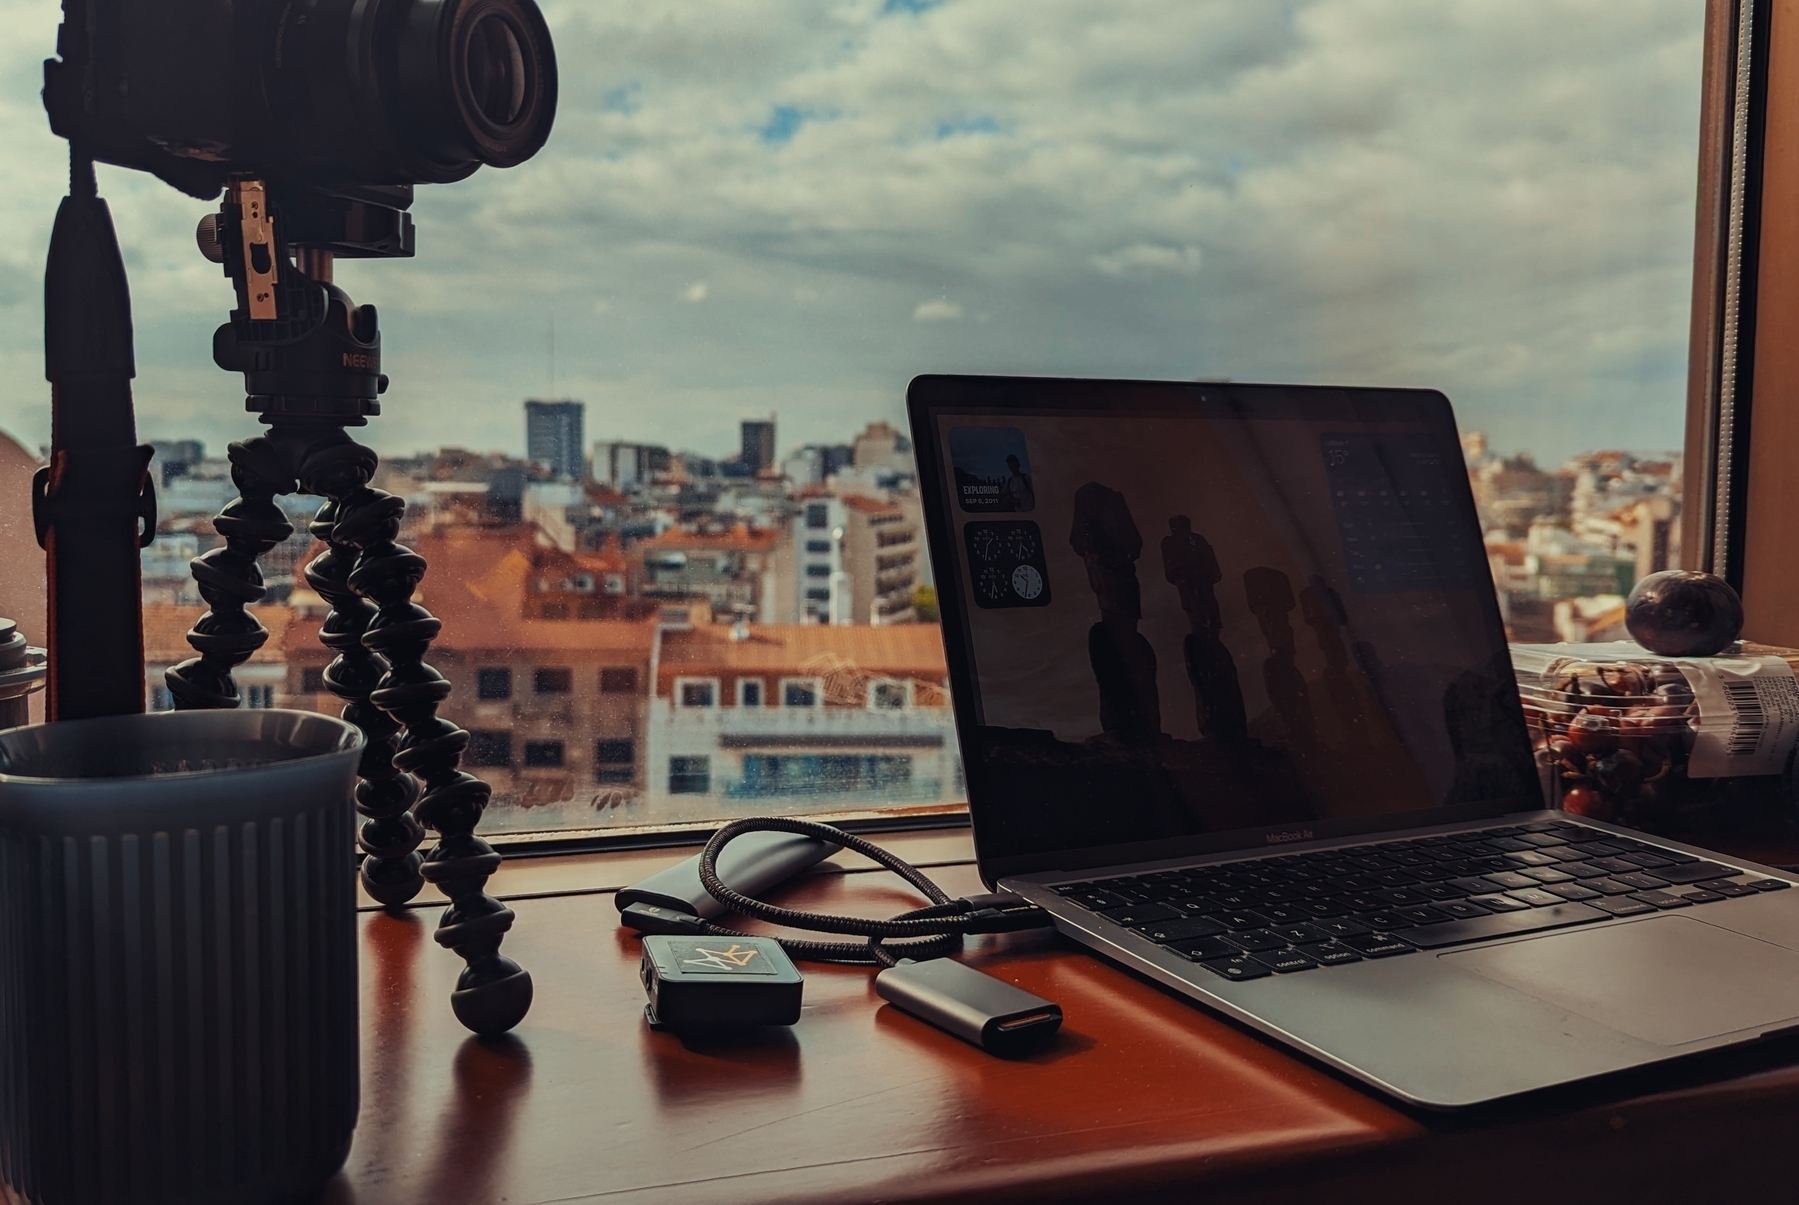
At least, everything I travel with is USB-C compatible, which means there is always a cable available to plug and charge anything. But not exactly everything. Guess what? All of those cables are useless for one device. I’ve been wirelessly charging my wife’s iPhone with my Pixel because she forgot to bring the Lightning cable. Thank you, Apple. Again.
🤔 In summary, the new iPads are even more powerful than my MacBook Air M1, but the iPadOS is still the same, making them lag behind.
How the Vision Pro caught my attention despite my skepticism
It looks like Apple did it again!
No, I haven’t purchased one and do not intend to do so anytime soon, but this is the first device of this type I would ever buy. Confused? Go with me for a moment. It will make sense, I promise.
Even though the Vision Pro isn’t the only Augmented Reality device out there, I always felt like all the others were made for gamers. It might be because of how they are promoted. I don’t know. But since I’m not a gamer, buying a virtual or augmented reality headset simply never crossed my mind.
It’s a computer
From the very beginning, Apple was clearly positioning the Vision Pro as a consumer device, but because of my gaming perspective and the price tag, it was never an item on my radar. Then I watched Casey’s video about it, and something clicked for me. This is definitely not for gamers. It’s not a gimmick for geeks, either. It’s for everyday people who prefer or have to use computers to do their work.
I’m still putting off buying a US$4,000 (after taxes and some accessories) first-gen gadget, but that video sent me on an endless journey on YouTube. Many people are showing it being used as a computer with several giant screens. In other words, one can use it to “work on a computer” with practically no desk space. All that real-world usage really spoke to me. Well, “real-world” might not be the best choice to describe it, but I think you got it.
I could never use the iPad as a Mac replacement. Despite Apple spending a fortune trying to promote it as a computer, it is not a computer. The restrictions imposed by iPadOS make my work much more challenging. The Vision Pro, on the other hand, can be connected to a real computer, and that makes all the difference.
So many Apps
However, a computer is only as good as the software library available for it. And as far as I could understand, everything that works on macOS will work when a Mac is connected. Which kind of brings us back to the old debate about touchscreen Macs, but I digress.
Then there’s visionOS, which has the potential to unleash a wave of new ideas, much like iOS did a long time ago.
And, of course, the younger generation that prefers mobile devices was not left out. Thanks to Scott Forstall’s advocating for the App Store on the iPhone, there’s now an abundance of Apps already available for Vision Pro.
Why not buy it?
Well, first there’s that price tag. Then there is the fact that it is a first-generation device. I waited until the 3GS to buy my first iPhone, and in hindsight, I should probably have waited until the 4S.
There is one thing for sure: Apple won again. I can clearly see myself purchasing a smaller, lighter, and much, much cheaper version of the Vision Pro in the future. And if it makes the Apple stock go up enough, I might be able to score one for free by selling some of what I own to buy its “4S” generation.
Will I be able to automatically save my Android photos to Apple Photos?
Even though I adore Google Photos and the endless slideshows on the Google displays I have at home and work, I wouldn’t entrust my memories to any one company. That’s why, for a long time, I’ve been using Google Takeout to download a copy of the photos from the previous year to add them to Apple Photos as a backup. The system works, but it’s too manual and prone to mistakes.
Maybe you don’t know this, but even when you use Google Photos to manage the pictures you take, Android will keep a copy of them in the DCIM folder on your phone. And as far as I know, they will not be automatically deleted. To free up space, you must use the cleanup option or manually delete them. But what if I told you that this inconvenience could work in your favor?
The other day, I had one of those click moments that helped me see this issue as a blessing in disguise. Here’s what I’m currently trying to do as I write this post.
Remember Syncthing? I set it up to synchronize the DCIM folder on the Pixel with a folder I created on my Mac. If you don’t know what I’m talking about, please watch the video below explaining how to do it. On it I’m demonstrating how to sync Obsidian, but don’t worry about that. The steps are the same for the DCIM folder.
I am optimistic that this plan will address two issues. The first one is having an easier way to back up my photos, but it will also help me with cleaning up the images that are constantly piling up on my phone. To give you an example, early today, when setting the system up, I discovered 23 GB of old photos and short clips stored on my Android.
It will take a while for all that to be copied to the computer, but the beauty is that Syncthing works both ways. Once the files that have been synchronized with my computer are transferred to Apple Photos and deleted from the folder, they will be automatically deleted on the phone.
This is the very first test I’m doing to make sure Syncthing is correctly transferring everything to the Mac and then deleting the files on the phone when I delete them on the computer. If everything goes well, the next step will be to create an automation to replace the manual process on the Mac side.
This is all for now. When I have further updates about this idea, I’ll publish part two of this article.
Without experiencing the unknown variables, it’s impossible to organize efficiently
The best way to organize things, whether they’re physical or digital, is to accept the mess for a while. That’s why my strategy for organizing things is to always start with a messy environment, a blank canvas to play with. However there’s a catch: I have to pay close attention to what I’m constantly searching for and using.
It is only after rearranging things again and again and learning my necessities that I am finally ready to begin building the system that will meet my needs. But, there is no doubt in my mind that that will not be the final version. The world around us constantly changes, and we must adapt to keep up.
The tricky part is figuring out the exact moment when the messy stage has to give way to some order. I like to use a concept I borrowed from economics: Transactions Costs. In other words, if the mess is making me less and less productive, it’s time to pause and organize by choosing the best workflow I’ve come up with so far.
If you haven’t already, I encourage you to watch the video below. It’s about an Evernote notebook being built from empty to fully functional. It started out messy, and I added tags, links, etc. as I learned what I was constantly looking for and using.
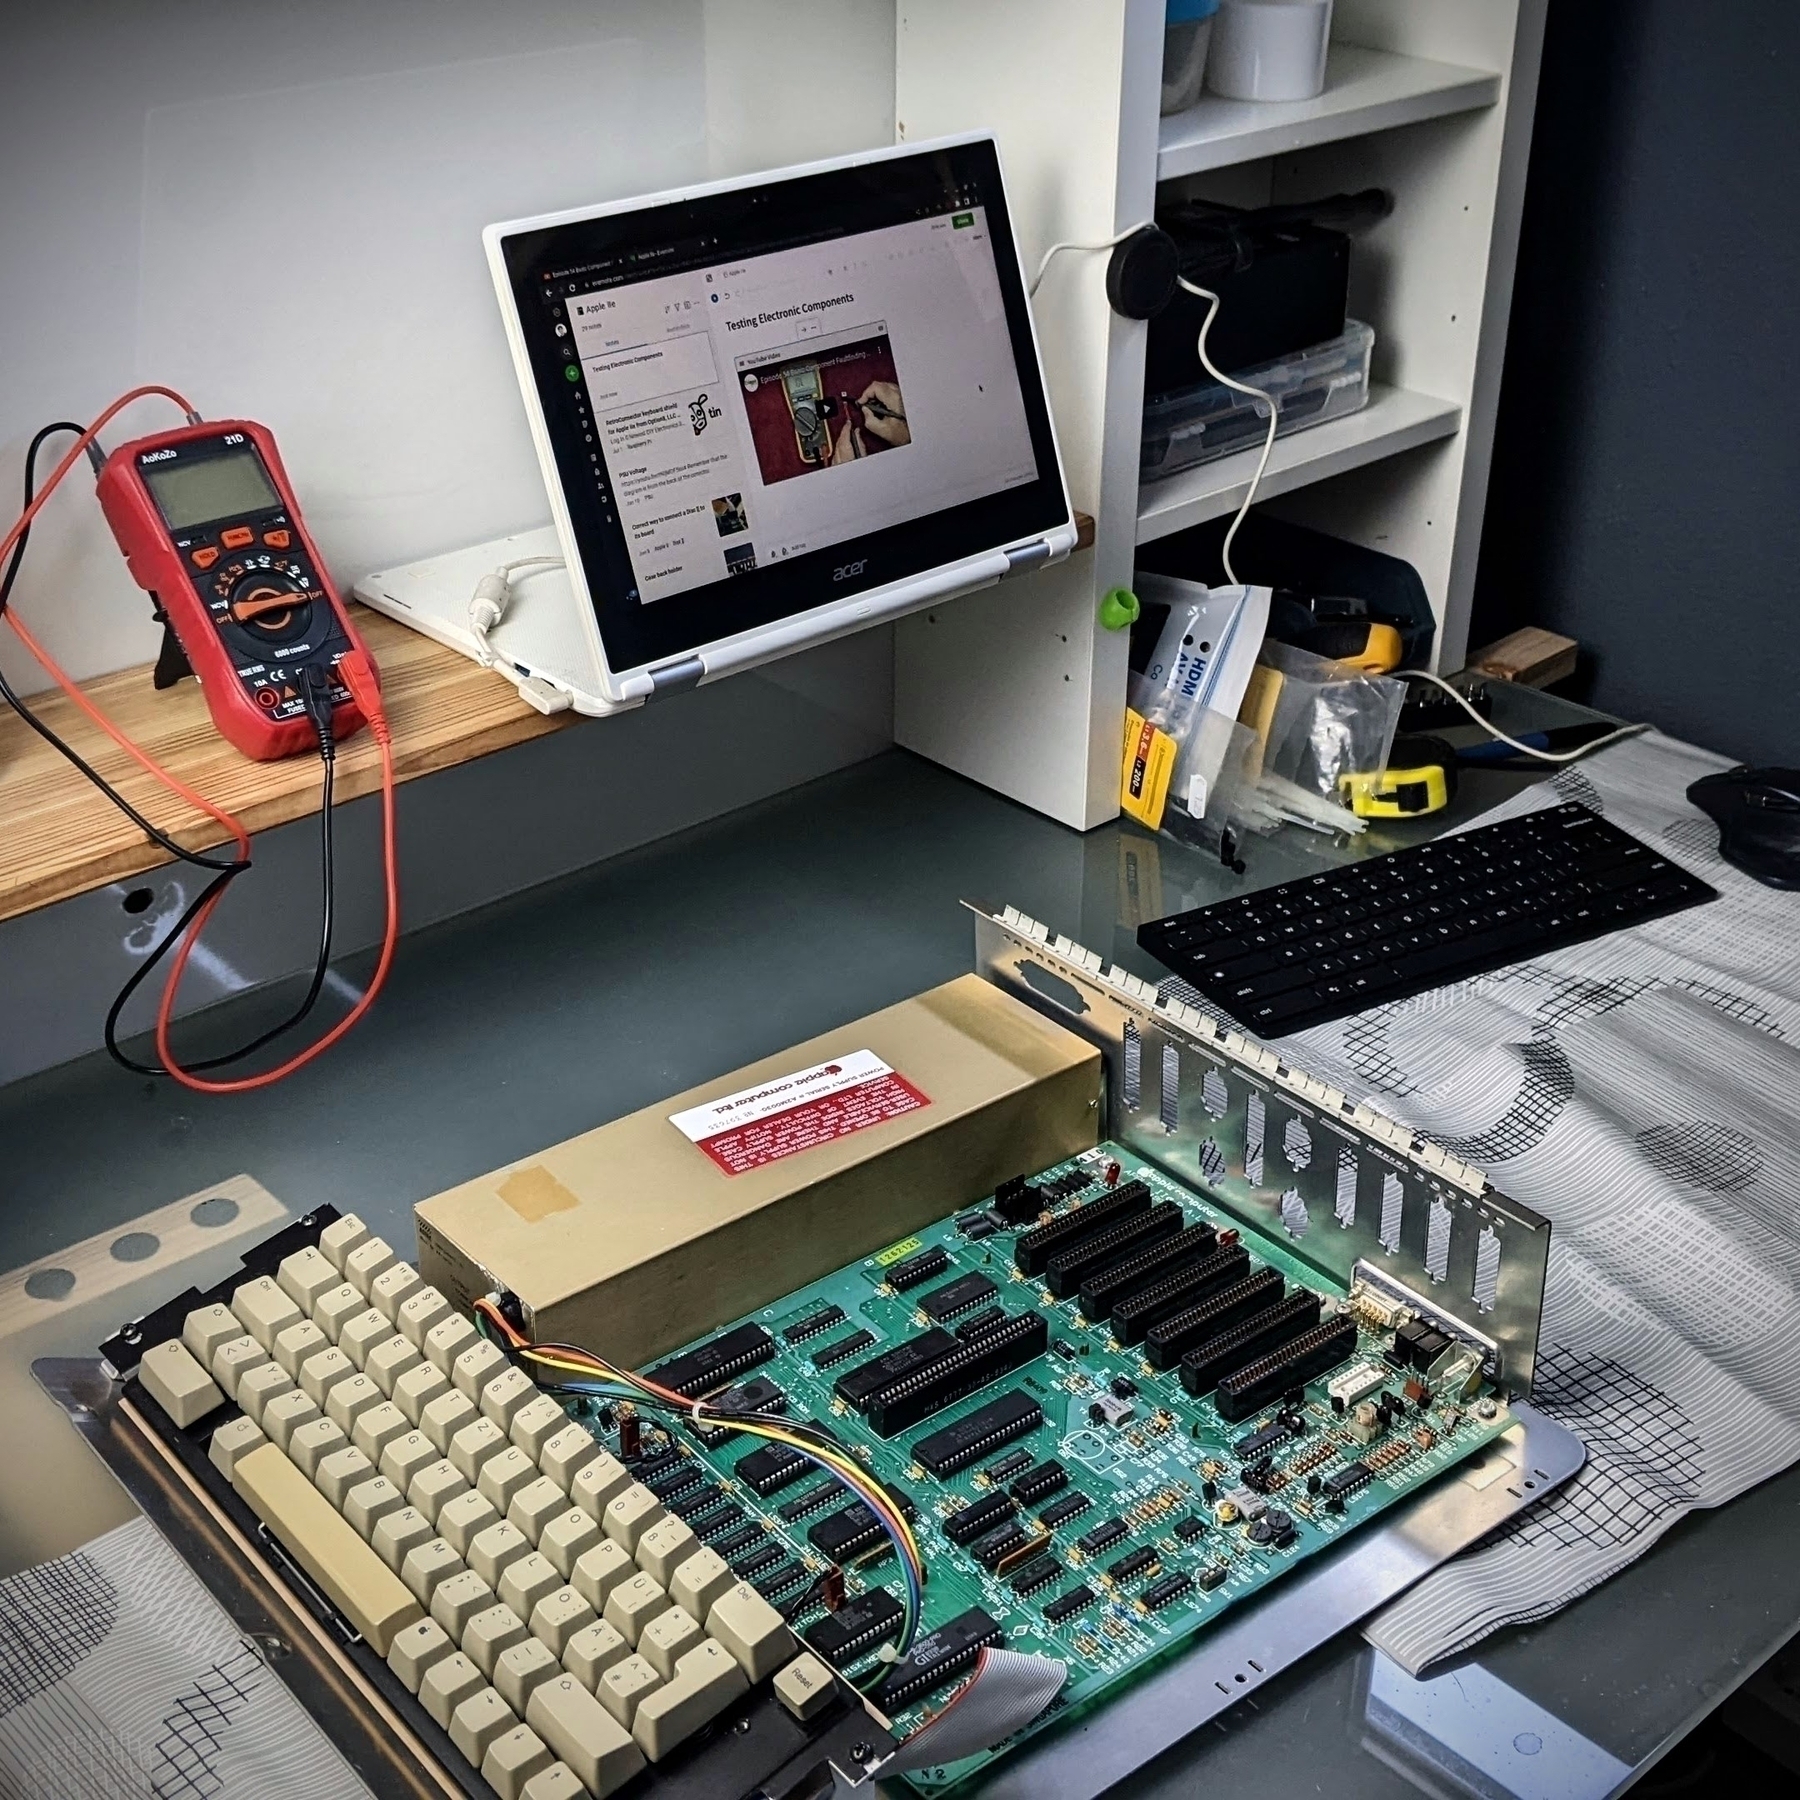
And like I said before, it’s a strategy that works in both the digital and physical worlds. Last week, I finally organized my workbench inspired by the way I moved objects around when I was working on the Apple IIe restoration project. I’m pretty happy with the final result, but I already had new ideas for it.
The messy approach is also a way to foster creativity. There are many good books about this subject. There’s one literally titled Messy, but The Click Moment and Algorithms to Live By also discuss it.
Moving things around forces us to look at a problem from a different perspective, which helps us come up with unexpected solutions. But it is important to keep in mind that the project on which we are currently working is not our sole concern. In my case, the messy workspace was also a project in progress.
Take a look at the shelf and the soldering station; they are all made from scrap wood. By the way, I love that cool industrial vibe. You can even tell from the black circles on one of the shelf legs that the piece of wood was once below the table glass. It was a test; I was trying to figure out how many crossbars I needed to keep everything stable and I ended up replacing the studs with the thicker ones that are there now. As for the rest of the replaced pieces wood, they were used on other projects.
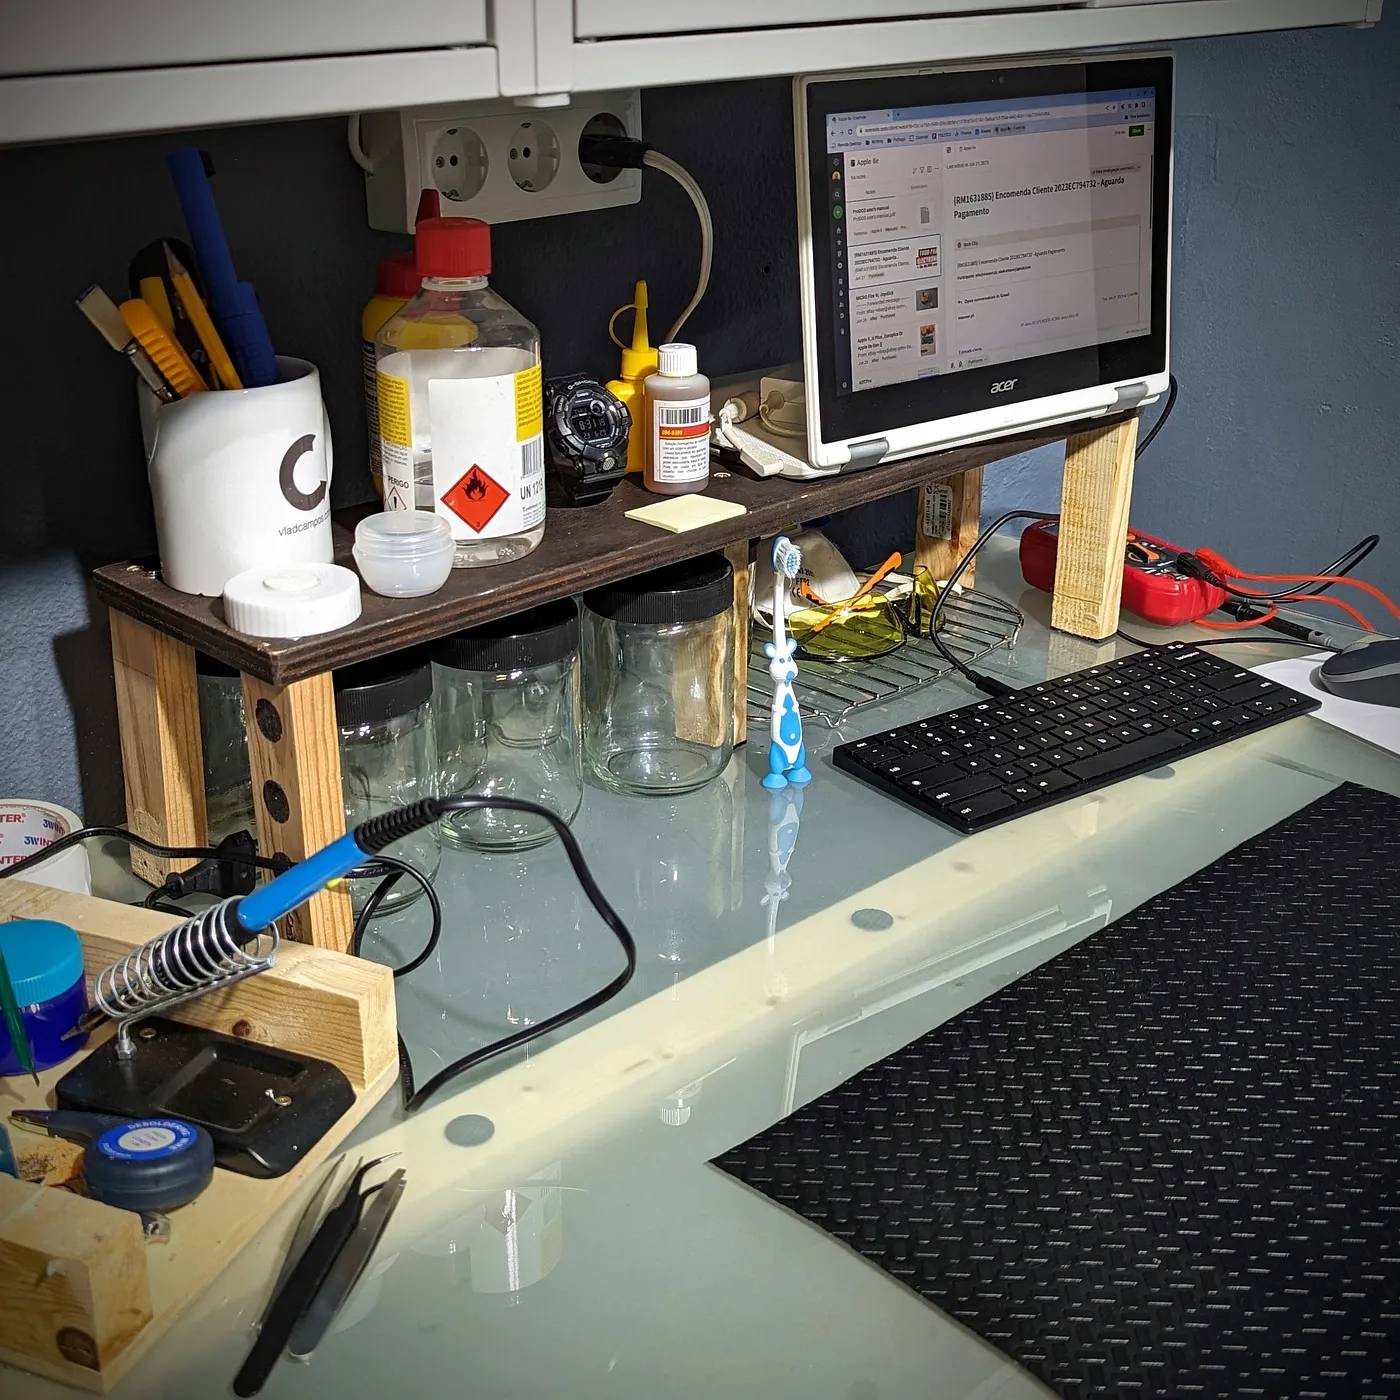
But there are more repurposed materials. The desk itself is made up of the top glass of an old kitchen table, supported by some cheap Ikea trestles. As for that Chromebook, it will not get Chrome OS updates anymore, but it is still good enough for Google searches and the Evernote web client.
So, the next time you are working on a complex project, don’t be too hard on yourself. Every so often, a little mess is what you need to unlock a solution that was always there, but you couldn’t see.
By the way, switching to another project also works, but that’s a story for another time.
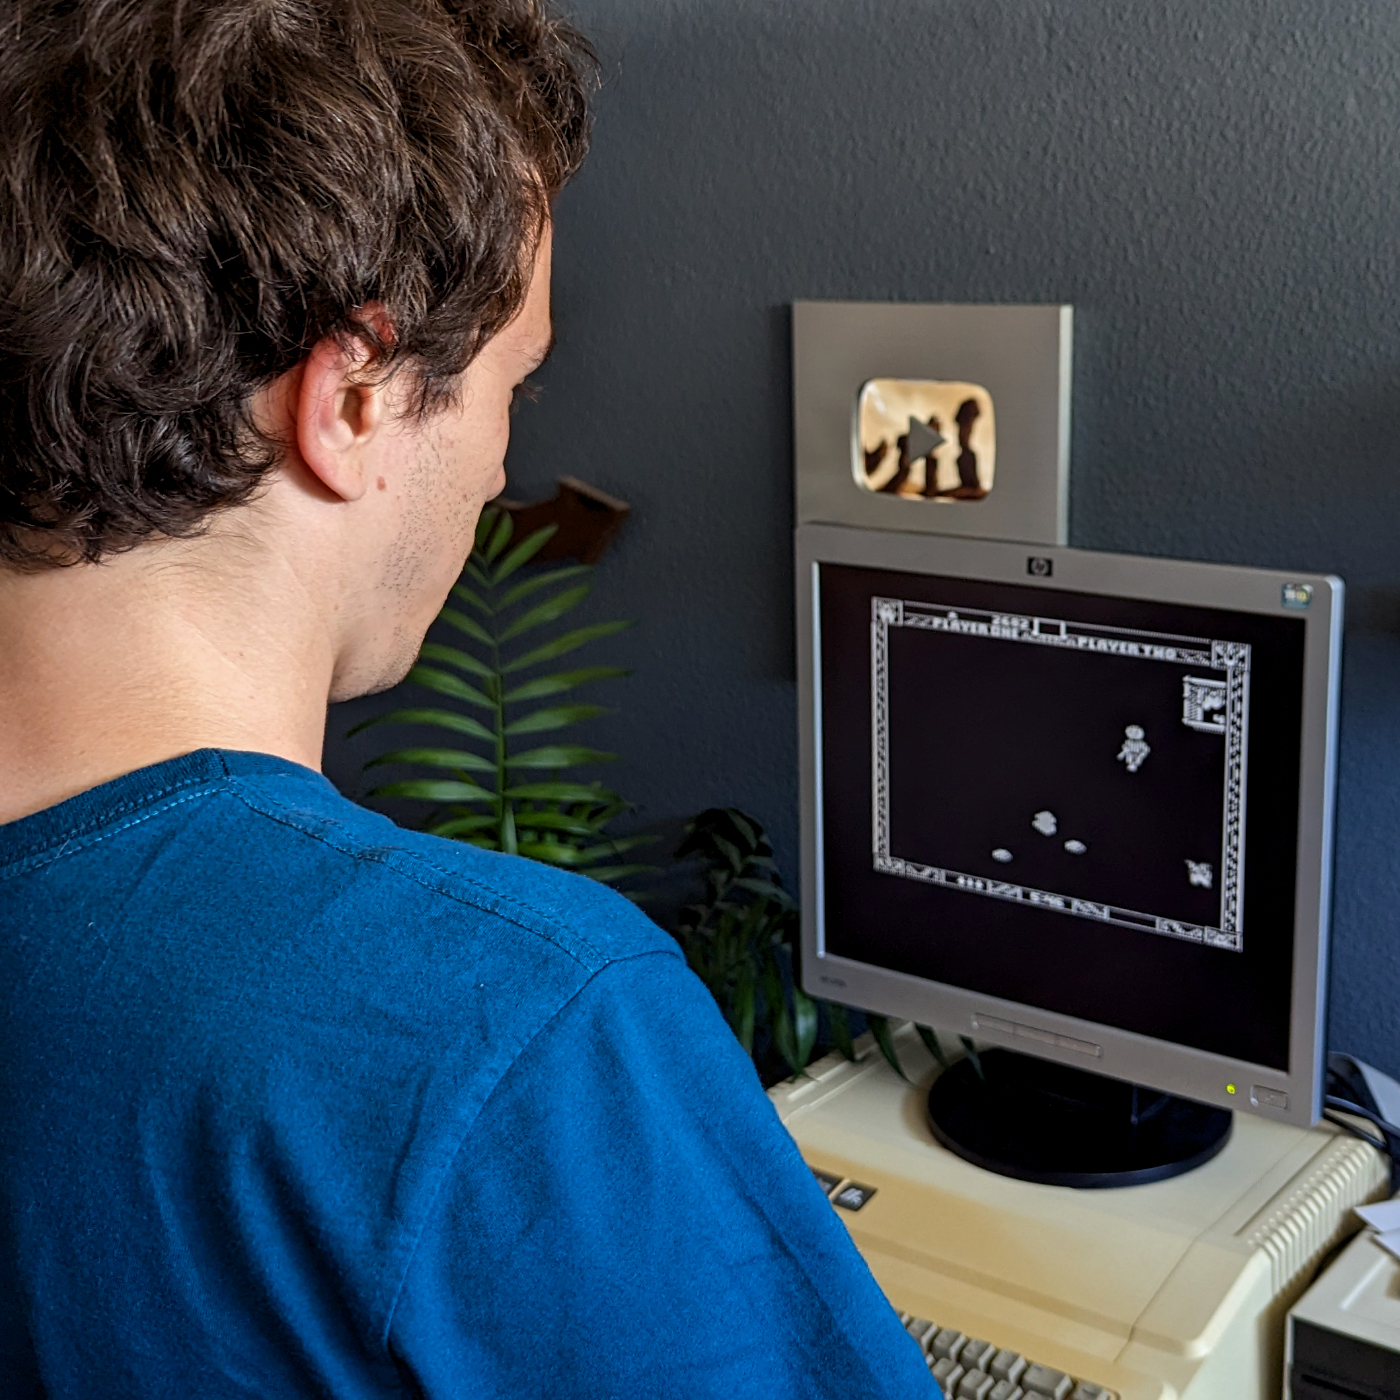
Generations
After helping me fix the issue with the ROM chips a few weeks ago, my son got to play Gremlins on the Apple IIe.
Is your computer truly yours?
It is remarkable how contemporary technology is built around the loss of control over our devices. In contrast, the Apple IIe, which is considerably older, is so open to experimentation and modifications.
One or two years ago, I wanted to try ChromeOS Flex and decided to install it on my old MacBook Air 2012. I enjoyed the process of installing it and had fun with the OS. Now I needed macOS back on the computer to be able to use it on the Apple IIe restoration project, but when it came time to reinstall macOS, things didn’t go well at all.
macOS Recovery
If you start macOS holding command + r, you’ll be prompted to reinstall the OS. I was counting on this when I decided to try ChromeOS Flex. Anyway, I tried all possible variations of the command + r command, but at some point, near the end of the process, a glitch would always stop the installation.
Another issue was that the countdown to the end of the process would display a huge negative number, which would also result in an error message. I searched online and found out that the negative number was related to a network problem, but my network and internet connection were working perfectly well.
I also tried to reinstall macOS by holding the option key. This is how you tell the Mac to search for external drives when it starts up. However, I was unsuccessful there as well. I was probably doing something wrong because the system would never recognize the installation disk on connected drives. It is also possible that the bootable part of the disc was damaged during the installation of Chrome OS Flex. I don’t know. Regardless of the reason, I am puzzled as to why I was encountering such difficulty. After all, it is my computer.
Downloading macOS
We are provided with downloads of older versions of the operating system, but I challenge you to try installing it on a computer with a dead or new hard drive. One must go through numerous workarounds to make it work. By the way, during my saga I also learned that Apple does not provide any official instructions for how to install an older OS over a newer one. Even worse, it tells us that we cannot do it.
Carbon Copy Cloner
After jumping from one website to another and failing miserably, I remembered that my wife didn’t get rid of her old Mac mini from 2012. My new plan was to clone the Mini hard drive using Carbon Copy Cloner. Of course, I had problems there as well. First, I had to find an older version of the program that worked with macOS Mojave. Next, the mini drive is 500 GB, and the Air’s is 64 GB.
To make a square fit into the circle, I created a new admin user (me) on my wife’s computer, and on Carbon Copy Cloner, I unselected her user and all the non-essential files before cloning. Of course, figuring out what are the essential files is easier said than done. After lot of trial and error, I was successful, but I would not be able to use this same strategy on a slightly newer Mac. My 2012 machine has a removable SSD, and I happen to have the correct USB enclosure. In other words, I could remove it from my computer and connect it to my wife’s Mini via USB.
My computer finally started, but the OS was extremely slow. It would take several minutes to boot, and the mouse was jumping all around the screen every time I moved it. Thinking that some issue could have occurred during the cloning process, I repeated it several times, but I had no success.
It was time to take a break, like I usually do when I get stuck.
The next day, I remembered that macOS has an Activity Monitor. I ran it, but to my surprise, the total CPU load was over 90%, even though no software or process was taking more than 5% of the CPU time. Back to Google!
Resetting PRAM and SMC
In the end, there wasn’t anything wrong with the cloning process. The issue was with the different computers. Using Carbon Copy Cloner to make a copy is like transplanting a brain from one person to another. The new brain in my MacBook Air was from a Mac Mini. To put it simply, I had to help it adjust to its new body.
I don’t have enough technical knowledge to explain this, but there’s a way to reset basic macOS configurations called PRAM and SMC. I reset them, and the OS started working like a charm.
Finally!
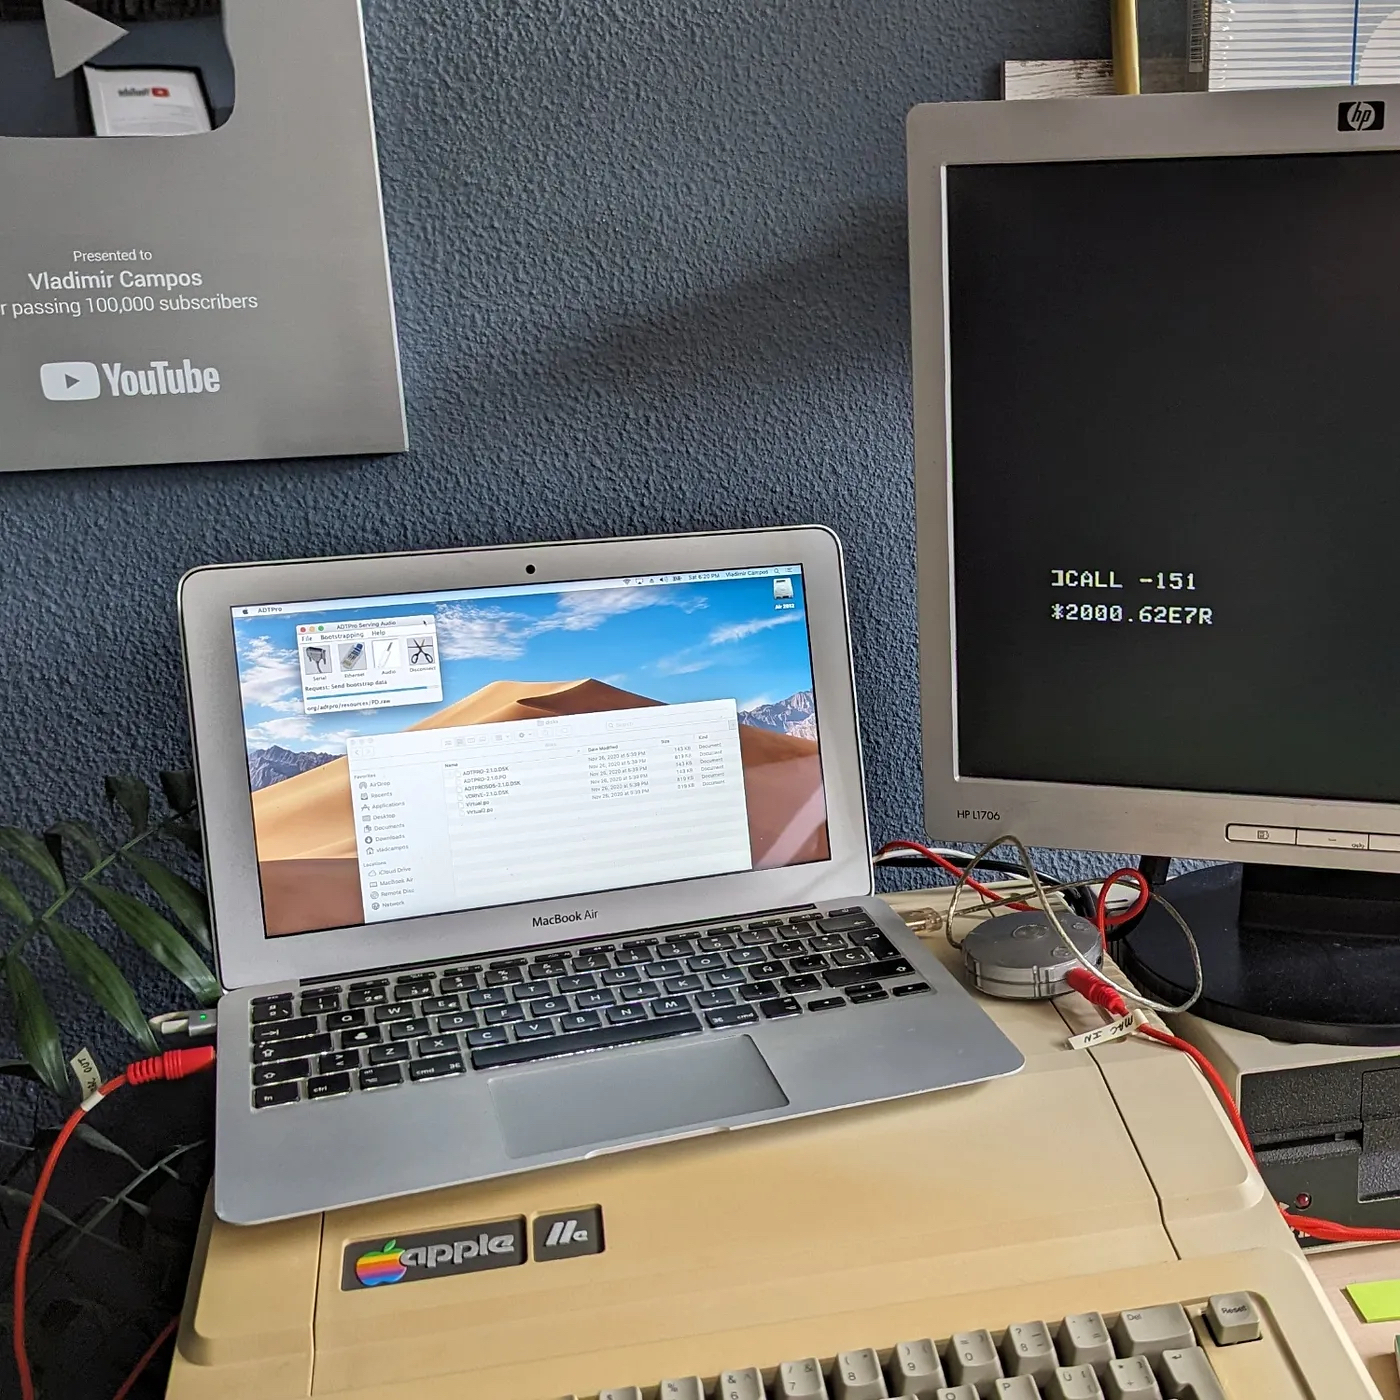
Anyway, all this was just another step in my Apple IIe restoration project. I could finally install the ADTPro software on the MacBook Air to copy old software to the IIe. Of course, I hit a new brick wall. But this is a story for another day.
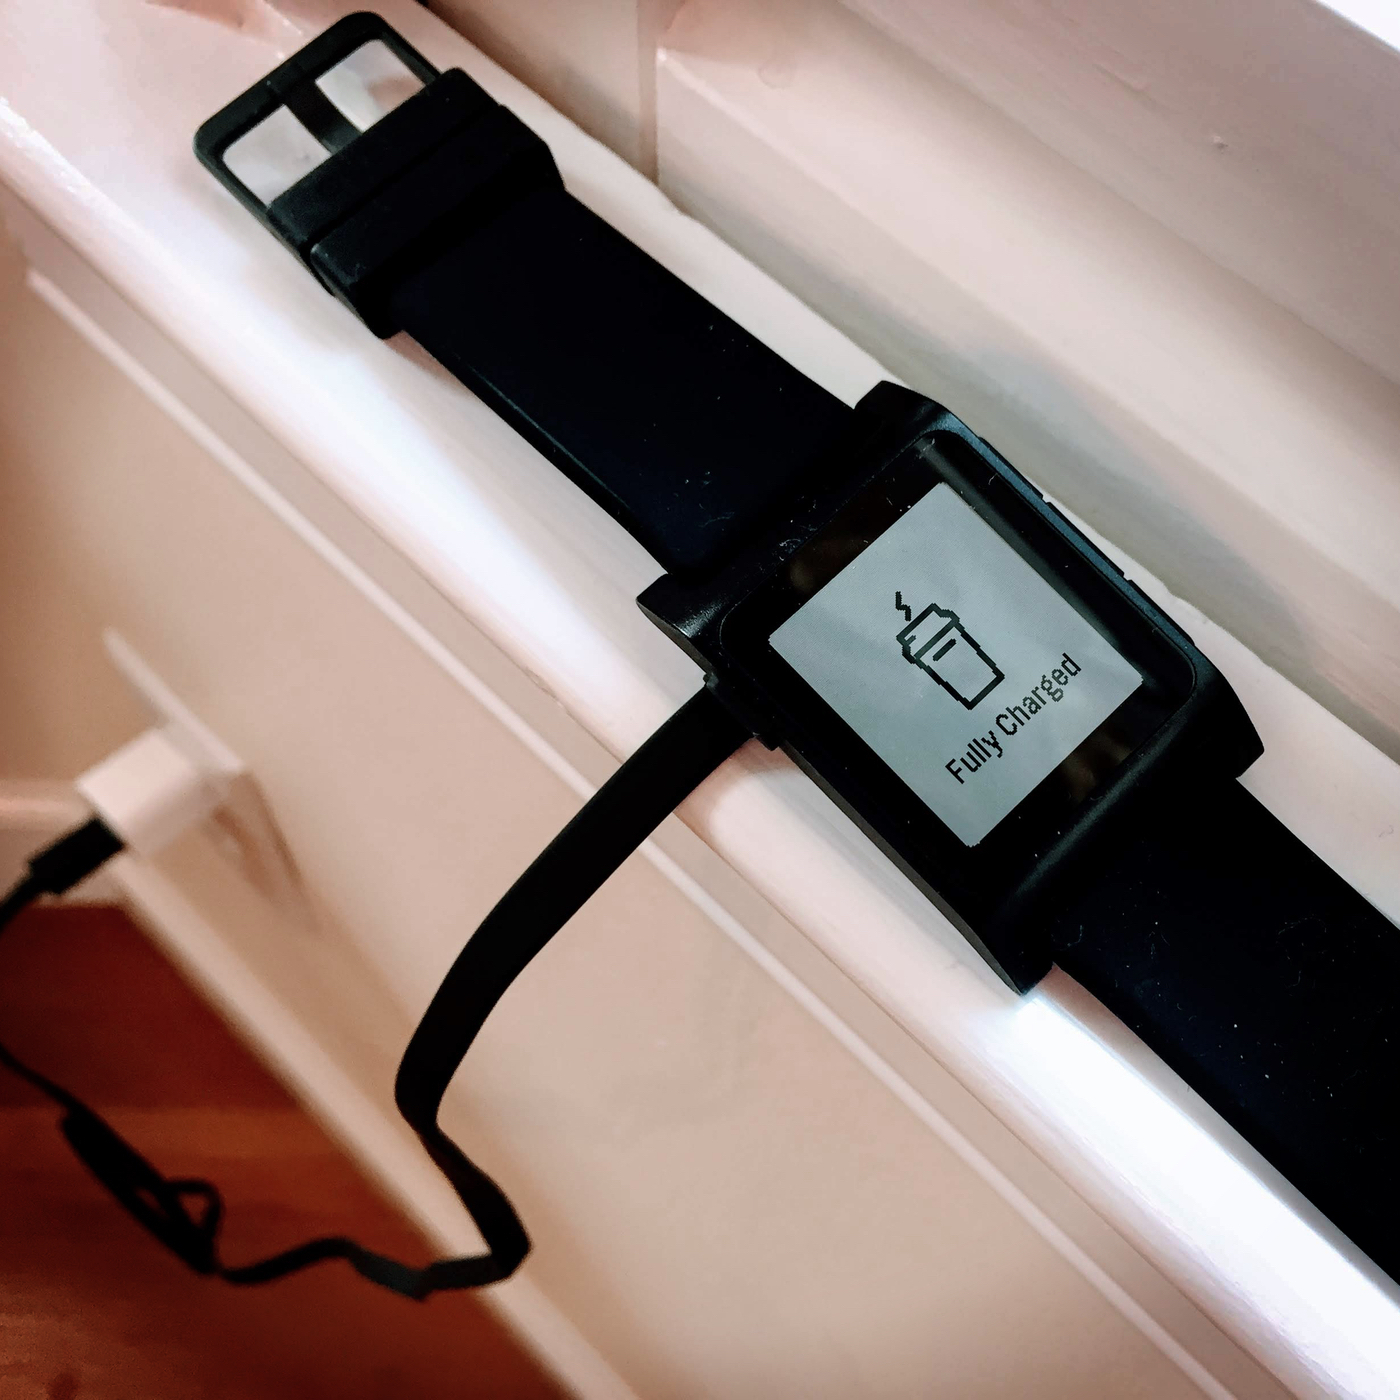
Why not an Apple Watch or Wear OS?
Before the Apple Watch, there was the Pebble (image below). I loved that smartwatch, but the end was inevitable, the company eventually went bankrupt, and was sold to Fitbit. The final nail in the coffin was the watch being discontinued, and the servers turned off.
Without the servers, many features would stop working, and the experience wouldn’t be the same. To save us, a group of enthusiasts created Rebble to bring life back to the Pebble. I appreciate what they did, but it’s not the same. Our watches would inevitably get old and parts would break.
Long story short, I could never find a smartwatch alternative that would check all the boxes: waterproof, buttons instead of touch screen, e-ink display, long-lasting battery, health sensors, and good quality build. I ended-up moving to a G-Shock, that I absolutely love. However, it was not a complete experience. I was constantly missing the health sensors.
It was only recently that I came across an alternative from Garmin. Yes, I completely missed the original Instinct release. But that’s ok. I recently got the Instinct 2, and I’m thrilled. Not only it checks all the boxes, it looks like the G-Sock I was wearing.
Apple IIe not working
The Apple II was the first computer I ever used. This is a IIe I recently got on eBay, but unfortunately, it is not working. When I plugged it in, I saw smoke coming from what, I think, is a capacitor on the C15 position on the board. Next step, figure out what that part actually is and order a replacement.
I have no experience with electronics, multimeters etc. This is definitely going to be a long-term adventure.
The intricate task of replacing the iBook G4 hard disk.
First, I connected the new disk to the Mac via USB, and with the help of Carbon Copy Cloner, I created a perfect copy of the old disk, which was still inside the computer. Then, after many layers and countless screws (pictures below), I finally reached the disk and replaced it.
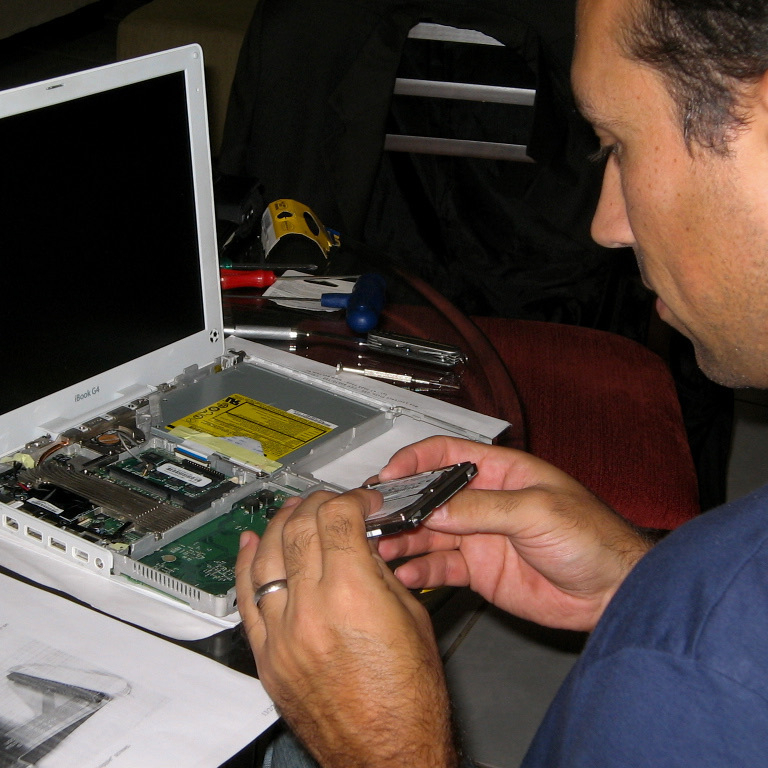
The operation took me a good number of hours, and despite the flawless boot, the sleep and wake function was not working when closing and opening the lid. It took me a while to figure it out, but the culprit was one of the magnets not being correctly aligned. Here we go again. To get there, I had to take off some layers and screws one more time.

The next problem on the list was the Wi-Fi not working. I checked the Airport Extreme card, which is easily accessible below the keyboard, and everything looked fine. After several hours of troubleshooting the operating system without any success, I realized how late it was and went to bed.
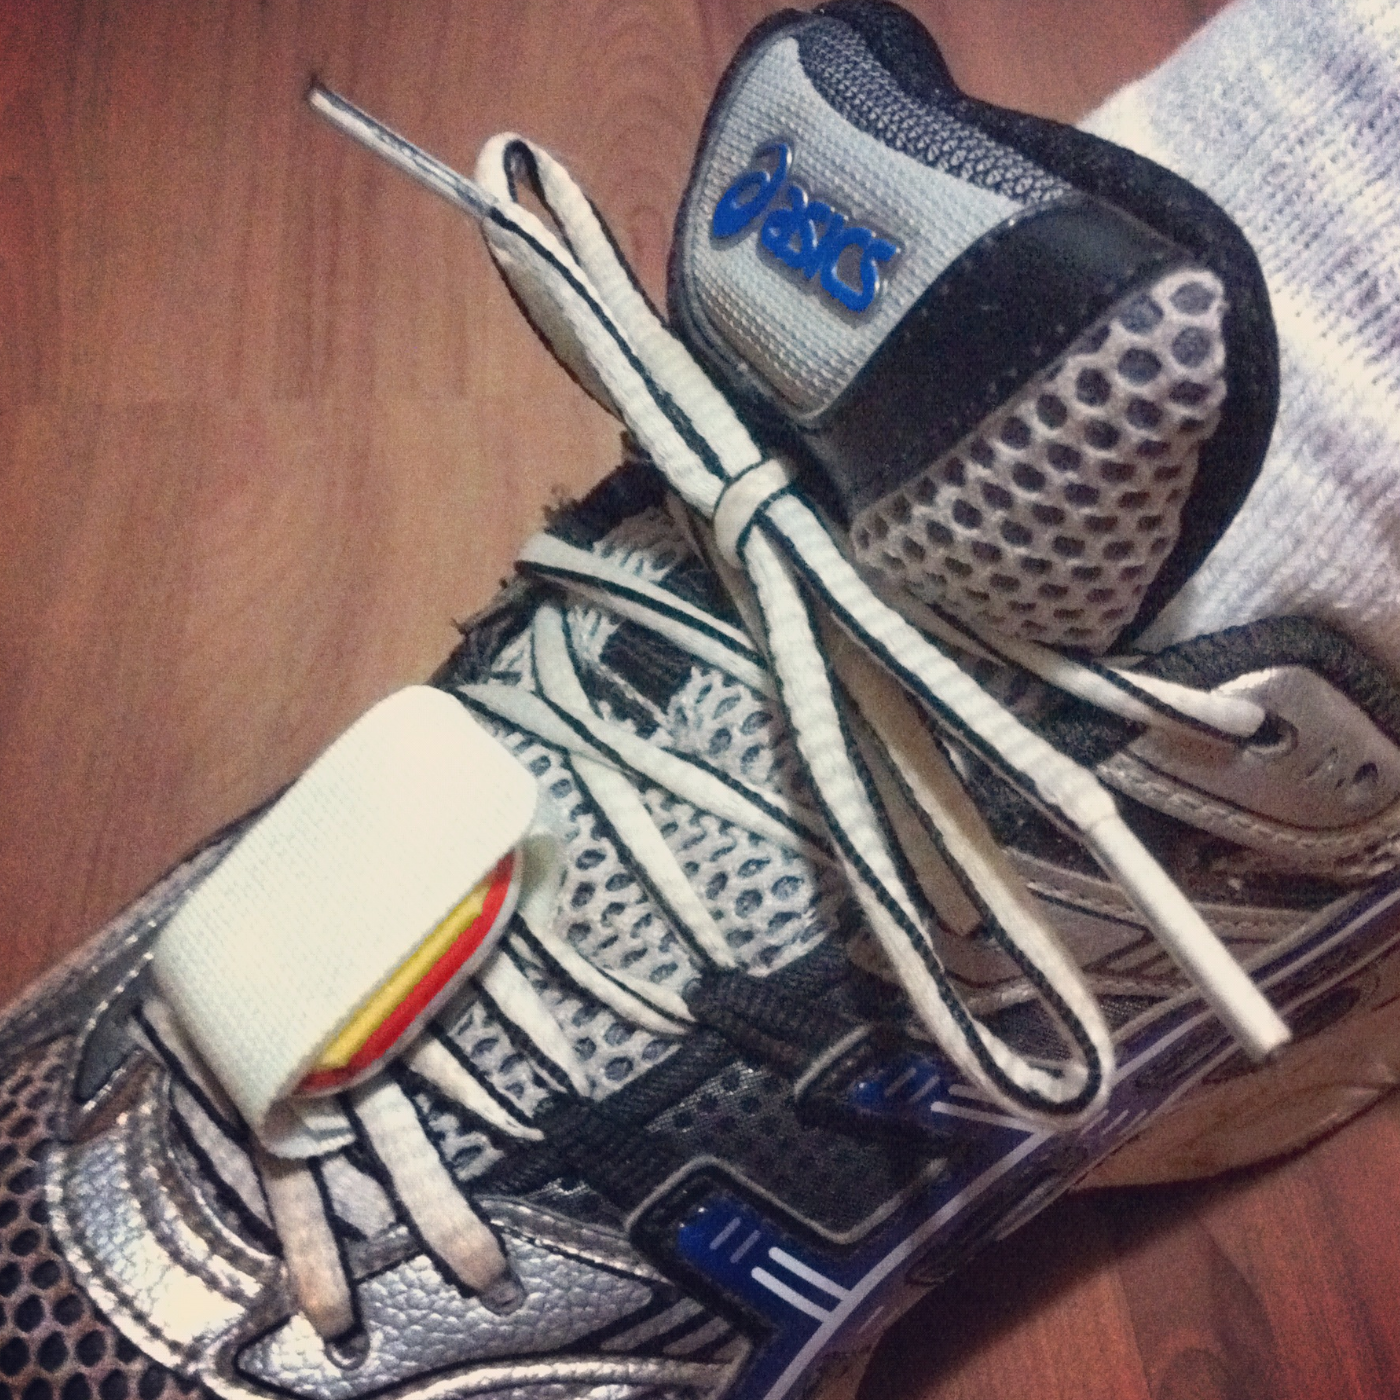
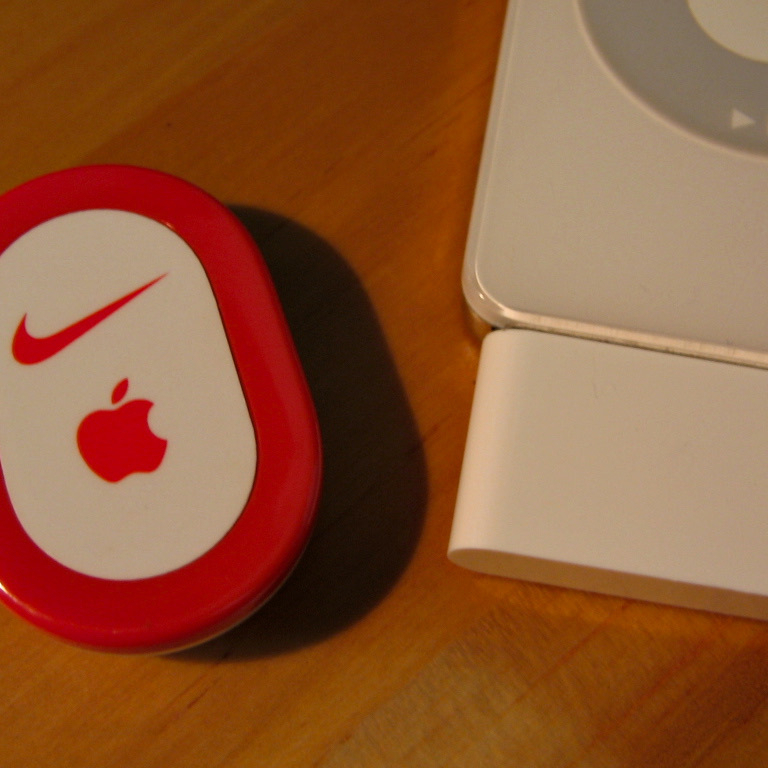
First 15K (using my Nike+iPod hack)
Yesterday, I completed my first 15K!
It was very difficult, and my time was terrible, but I am so happy to have completed it. It has not been that long since I started jogging, with my first small victory being running around a park with less than a third of this distance.
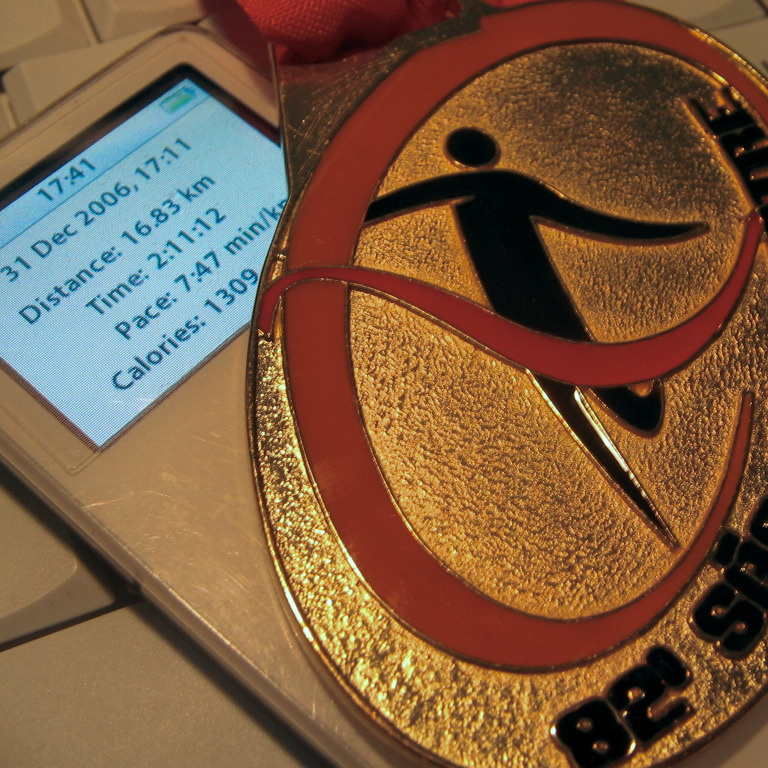
Oh, and I used the hack I created for the Nike+iPad.
Nike+iPod hack
Even though I don’t like Nike running shoes, I love running with my iPod, so I got the Nike+iPod tracker as soon as I could. But since it was announced, I have been trying to figure out how to attach it to my non-Nike shoes. Inspired by some adaptors being sold online, I came up with a simple hack.
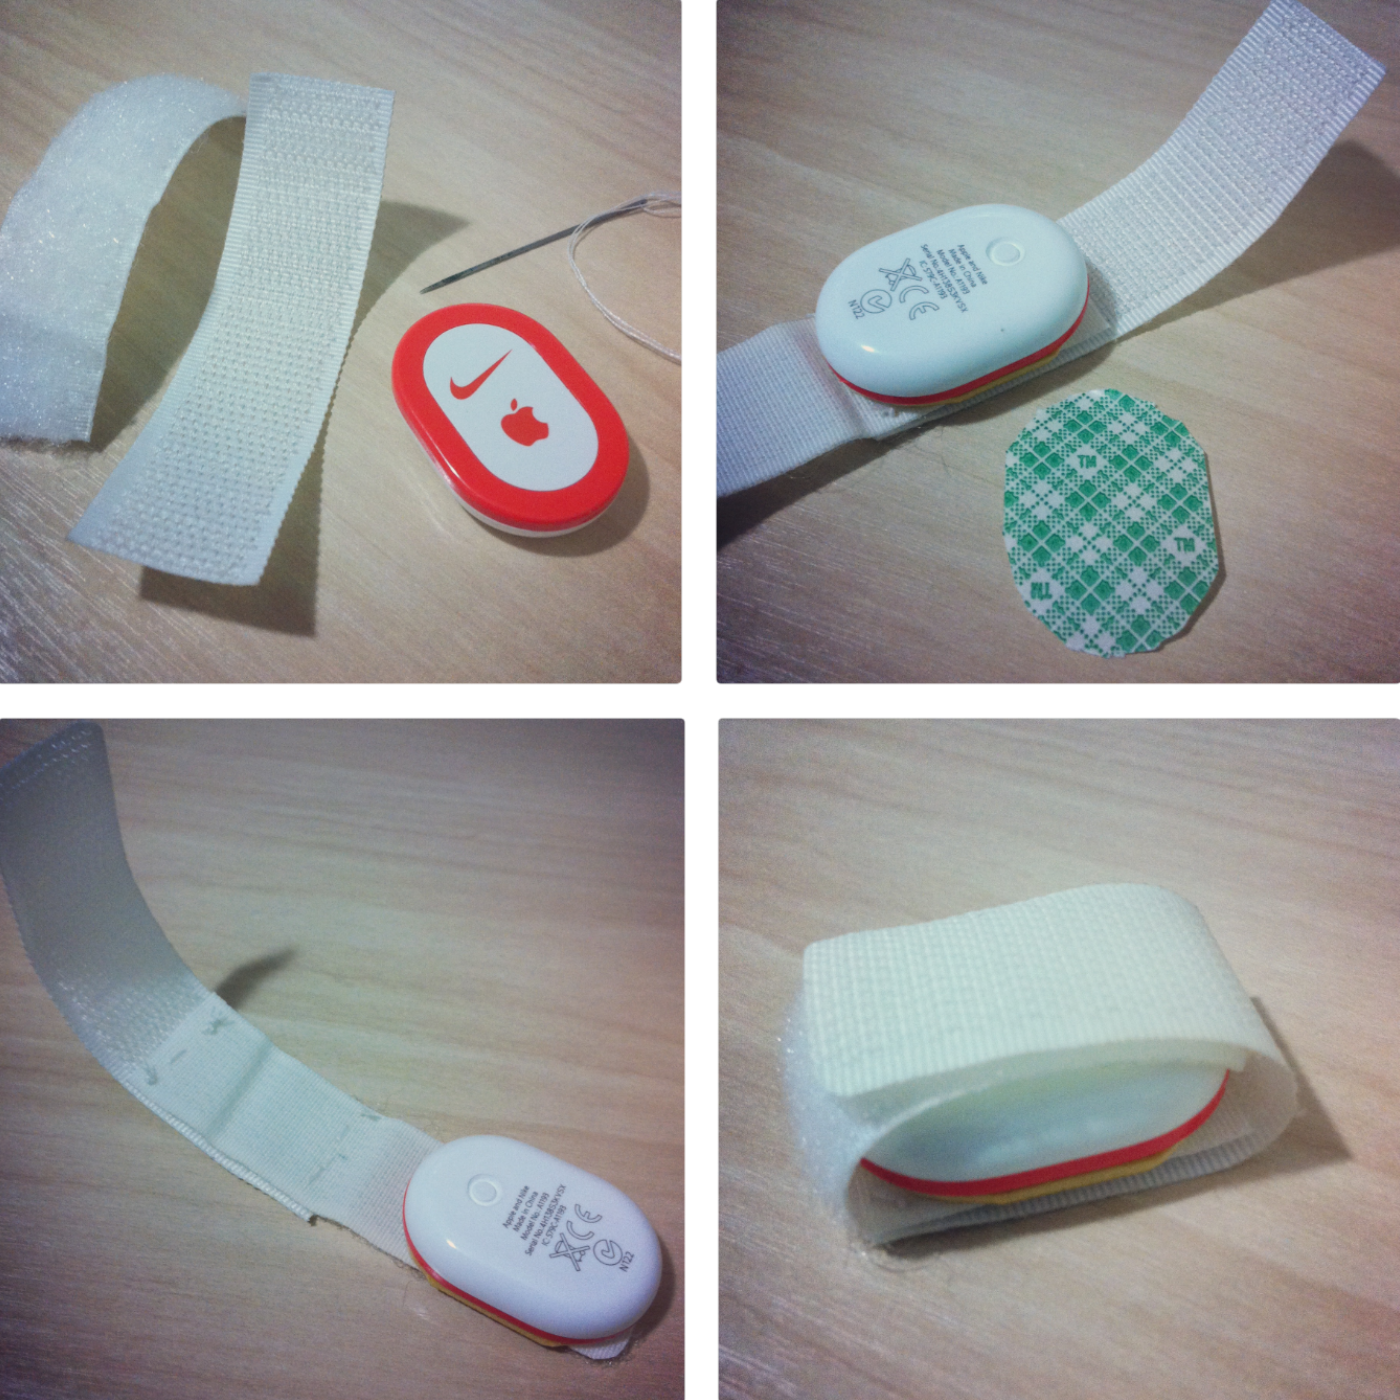
These are just two sides of a velcro trip attached to each other on one end. Because one is facing the other, the attachment sides will also meet on the opposing end, closing the loop after passing it under the laces. I don’t really think it was necessary, but I stitched the center part just in case. As for the Nike+iPod, I glued it using 3M double-sided tape.