Android
- Apple ID
- iPhone and iPod touch models with iOS 14.5 or later
- iPad models with iPadOS 14.5 or later
What is Syncthing-Fork
After the Syncthing Foundation decided to discontinue the Android client, I’ve been using Syncthing-Fork, which is non-official open-source version based on the original Syncthing for Android.
Obsidian as a writing hub
Scrivener and LanguageTool are remarkable tools that I use all the time, but they don’t have an Android App. Luckily, Obsidian works as an elegant bridge that has clients for multiple platforms.
Please allow me to begin by explaining the situation. I’m a Mac user who switched from the iPhone to Android many years ago and have no intention or desire to go back.
That said, I sometimes come across great writing tools like Scrivener and LanguageTool that don’t have an Android App. Thankfully, Obsidian is an important part of my writing kit and has clients for multiple platform. This is the story of how I use it as my writing hub.
Scrivener is where I’ve been writing my books since 2012. I don’t know how others create, but in my case, I usually start by writing down ideas as they come to mind. When there’s enough content and a lot of mess, it’s time to organize the text, and that’s probably my favorite thing about Scrivener. Coping and pasting is harmless, since the draft file has no formatted text, and it is also extremely easy to rearrange chapters by simply dragging them around.
Another crucial aspect of writing is grammar. For a non-native speaker like myself, a little help with synonyms and sentence construction is very welcome. That’s where LanguageTool shines. It feels as if I have an English teacher constantly suggesting changes to improve the text.
Don’t ask me why, but Scrivener never added support to LanguageTool, despite the existence of an API. So, even when using my Mac to write, I can’t benefit from both of them working together. And when I’m away from my computer, things become even harder because none of them have an Android App. That even affects the Supernote, as it is also an Android under the hood.
Thankfully, there is a way to connect all of these seemingly incompatible pieces. Several months ago, I shared a workaround for using Scrivener’s sync feature to have access to your book’s draft as Markdown files in Obsidian. You can learn ho to do it, by watching the video below.
Yesterday, you learned about another part of the puzzle. There is a LanguageTool plugin for Obsidian that uses the same API Scrivener could be using to make writers' lives more comfortable.
By combining both methods — synchronizing the book with Obsidian and using the LanguageTool plugin — we can create the perfect solution to use the spell checker when writing on a Mac or using an Android phone. Which also includes the Supernote. Isn’t that cool?
However, that is not all the writing I do in Obsidian. This article, for example, started as an idea in my Creator Action Container. The note was born there when I was riding the subway and wanted to write some ideas and drafts of a few paragraphs.
I kept working on it the next day, but this time I used Obsidian on my computer. In both cases, LanguageTool was there helping me. When it was finished, I moved it from the Action Container to the website folder to then make it available online, where you are reading it now.
If you’d like to learn more about all of these interconnected folders, please watch the video below.
How to install Android apps on a Supernote using a Mac
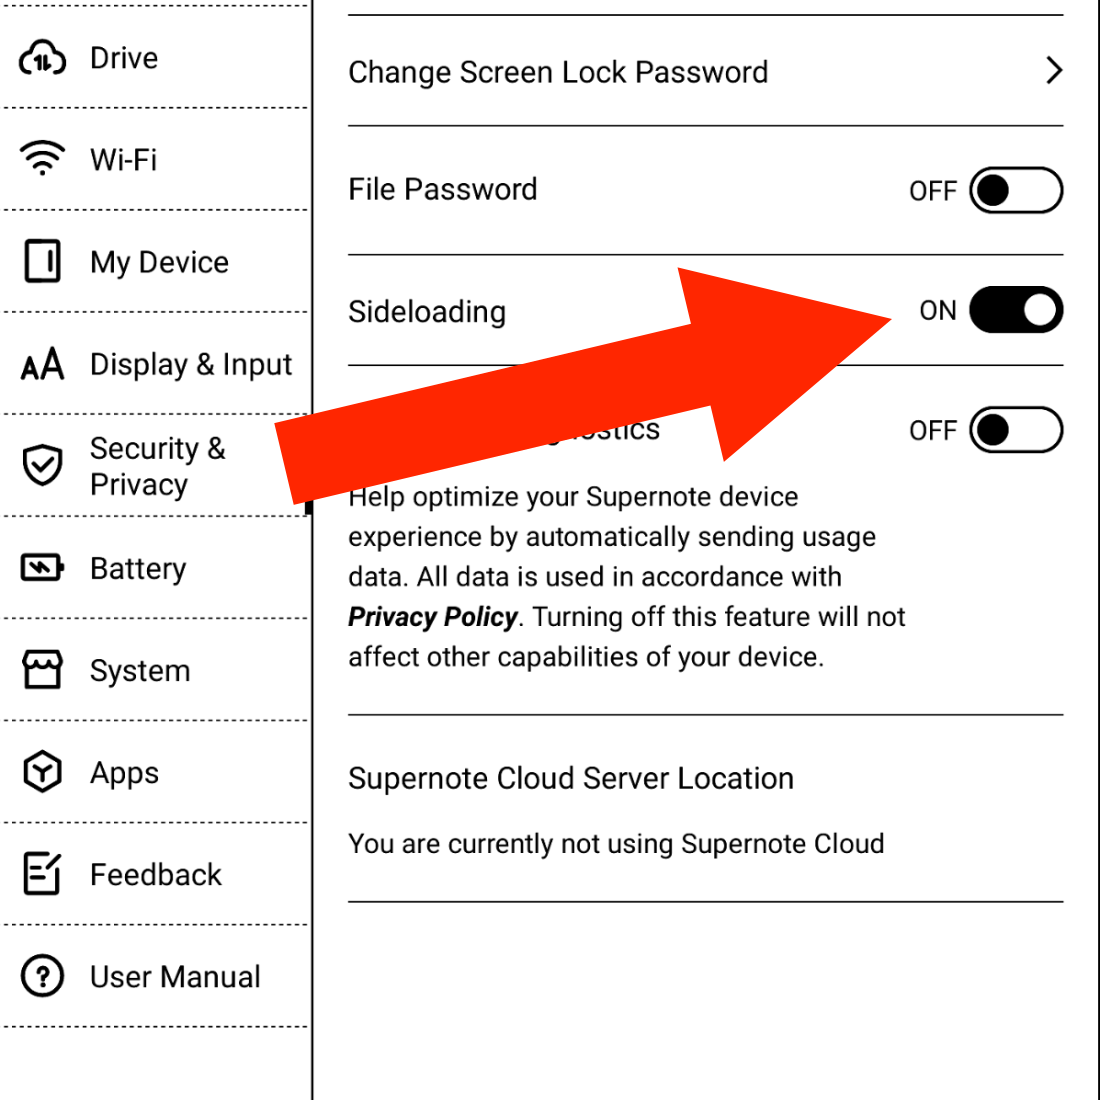
The first step is to prepare the Supernote to receive Android apps. Go to Settings, then Security & Privacy, and then turn on Sidloading. This means that you are allowing the Supernote to accept the installation of Android apps.
Next, we have to make sure the Supernote can connect to the Mac. Under the hood, the Supernote is an Android device, so we will need to install an app on the Mac to allow both of them to talk to each other. This step was a bit of a pain for me. After trying different options, MacDroid was the one that worked. If that does not work for you, please search for other options on Google and try them.
I suggest using the Supernote USB cable, as not all USB cables are the same, technically speaking.
Now we need to get the Android apps ready. Obsidian offers the APK on its website, which, I think, is an excellent practice, as they are the company behind the app.
I am also using Syncthing-Fork, which I downloaded from the developer’s GitHub page. However, if you are using Obsidian Sync, you don’t need Syncthing. Please download either one or both and place them aside for now.
Next, download and install Homebrew. You’ll find the instructions on their website. Just follow the steps. This app is needed to install the next app on your Mac.
Now download the Android SDK Platform-Tools, which is what will actually talk to the Supernote. To install it, you’ll have to use a command on the Terminal.
To open the Mac Terminal, hold the Command key and press the Space Bar. Type Terminal in the search box and click to open the Terminal. In the Terminal window, write the following code:
brew install android-platform-tools
When you hit Enter, Homebrew will install the Android SDK Platform-Tools on your computer. You’ll see some code scrolling on the screen and then a message that says it was installed successfully.
Now it’s time to connect your Supernote to the computer, and make sure MacDroid can see it as a device.
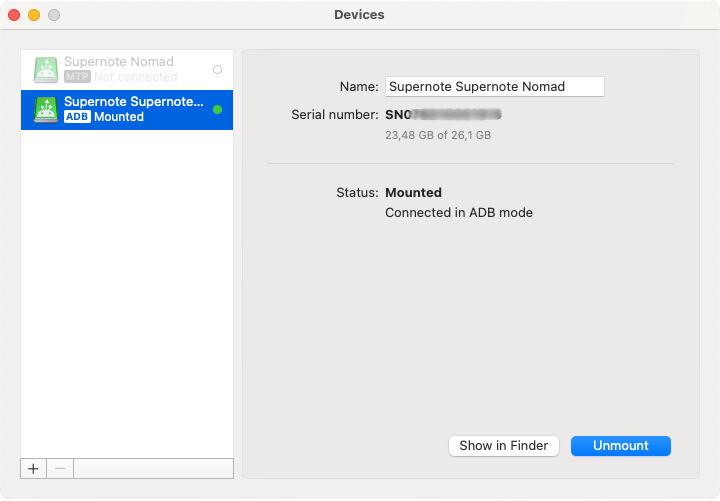
If you get a screen like the one above, go back to the Mac Terminal and type the code below to make sure the system is seeing it:
adb devices
You should get a message similar to the one below.

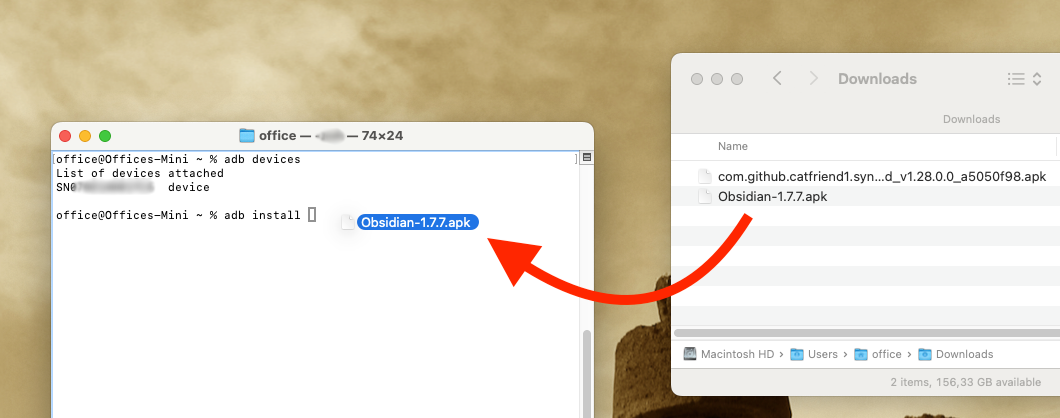
Finally, it’s time to install the Obsidian APK (Android file). Go back to the Mac Terminal and type adb install, followed by the path to the APK file on your computer. In my case, it looks like this:
adb install /Users/office/Downloads/Obsidian-1.7.7.apk
Alternatively, you can type adb install, hit space, and using the mouse, click and drag the APK file to the front of the command. That will create the path for you. Hit Enter and wait until you see the success message.
That’s it. To install other apps, repeat adb install command, adding the path to the app on your computer.
All note-taking apps should implement this new Android feature.
Even before the DMA came into effect, Android users could choose and set their preferred browser, SMS app, and more. This can be done by going to Settings > Apps > Default app. Now, Google has announced that note-taking applications will also be included in the list.
There will be a shortcut on the lock screen to open the note-taking app without having to unlock the device. It looks similar to the Apple-Notes feature on the iPad. But unlike Apple’s walled garden, users will be able to choose their preferred note-taking app.
There are some adjustments to the app that must be made, which are explained in this I/O 2024 video. What I didn’t get is whether this is an Android feature or just meant for tablets running Android.
Even if it’s only for tablets, I think all companies that make note-taking apps should implement the changes needed to use this new feature. We, the users, will appreciate it.
Android's Answer to AirTags is here. Time to switch!
Wait, there’s another competitor. Who would have believed that Tile would pull such a card from its sleeve?
If you go to the AirTag page on Apple’s website, and check the ‘System Requirements and Compatibility’ information, you’ll see this:
As you are already aware, I am a Pixel user, so it was the third item in the list above which convinced me to become an early adopter of AirTags. And even though Apple says the company designed the AirTag to track items, not people or pets, my plan was to do exactly that: attach it to my dog’s collar.
When I asked Drance about parents using AirTags to track their small children (such as during an outing at an amusement park) or pets (we know you’re up to something shady, Fluffy) she was quick to stress that the company designed the AirTag to track items, not people or pets. If parents would like to safely track their young children, she suggests an Apple Watch with Family Setup might be a better choice. (source)
My dog’s AirTag.
When the AirTag arrived, I linked it to my iPad and immediately started testing it. Every time my wife would go on a longer walk with our dog, I would track them simultaneously on Google Maps and Apple ‘Find My’ app. To accomplish that, my wife would leave her iPhone behind and bring an Android that was sharing its GPS location with me.
If she were to take the iPhone with her, it would be too easy for the tracker. My goal was to learn how the AirTag would perform when having to rely on other people’s iPhones to do its thing. And to my surprise, the first tests went very well. The ‘Find My’ app would show our dog about a block behind the Android GPS, which was expected and quite accurate if you ask me.
However, on walks very early in the morning, I would completely lose track of my dog on the map. The same would happen in large and spacious parks. All of that was also expected, but sometimes it was not working, even when she had people around her. Android users, for sure. But that’s not all the problems I experienced.
I don’t know why, but the AirTag alarm would go off every other day even when my dog and the iPad were close to each other. Extremely close to each other. I would be sitting on the couch reading something on the iPad, with my dog lying down by my side.
That, I could never fix. Even after unpairing, resetting and parring again several times. It was so frustrating that I ended up destroying the AirTag.
Relax, it’s not what you are thinking.
We had a trip coming up, and our dog would stay with a pet sitter, which meant she would inevitably face the ‘away from owner’ alarm. As for the ‘AirTag traveling with you’ alert, that’s okay, as I definitely would tell her about the tracker.
Long story short, I decided to disable the speaker altogether. This would also solve the issue of the alarm going off when it wasn’t supposed to. Taking great care, as always, I went about the delicate process. Unfortunately, after the surgery, the AirTag refused to pair.
That was the perfect timing to try the Chipolo Spot, which is compatible with Apple’s network. I bought a 4-pack, and guess what? One of them also had the alarm going off almost every day. Maybe it’s an issue with the iPad parring, since it never happened to the ones paired with my wife’s iPhone.
Google’s Answer to AirTags
A few days ago, I received an email from Google with the news I was expecting for a while and decided to buy new takers.
Find My Device network is coming soon.
You’ll get a notification on your Android devices when this feature is turned on in 3 days. Until then, you can opt out of the network through Find My Device on the web. After the feature is on, you can manage device participation anytime through Find My Device settings on the device.
How it works.
Devices in the network use Bluetooth to scan for nearby items. If other devices detect your items, they’ll securely send the locations where the items were detected to Find My Device. Your Android devices will do the same to help others find their offline items when detected nearby.
Of course, there are plenty of people using iPhones here in Europe, but Apple’s phone is only more popular than Androids in the United States. Android has a much larger market share worldwide, which translates to a potentially wider network for Google’s ‘Find My Device’ service when compared to Apple’s ‘Find My’. And that’s something I’m excited to test.
I purchased another 4-pack, but this time it was a Chipolo Point. Point? What about the Spot? Okay, time to decode Chipolo product line.
Be careful
Similar to Tile, Chipolo already had its own network and was selling distinct tracker models, namely ONE, which resembles a circle, and Card, which resembles, well, a card.
When Apple introduced the AirTags, Chipolo released compatible trackers, which they branded as Chipolo Spot. And now there’s the Chipolo Point, compatible with Google’s ‘Find My Device’ service. The appearance and form factor of the models are the same, no matter the network. So, always pay attention to what you are buying.
The Future
Life360, the parent company of Tile, which has never mentioned trackers compatible with Apple’s or Google’s networks, recently announced a GPS-Bluetooth network in partnership with Hubble Network. What‽
I’ve never heard of this network or the technology before, and am interested to see how a satellite can pick up a Bluetooth signal from Earth. But besides the brief post and hyperbolic video published on Life360 website, there is not much said about anything else. And I have so many questions. For example, will there be a subscription? Will current Tiles work on this network? Does the satellite constellation currently exist?
In any case, I’ll be taking good care of the Tile trackers I still have in my drawer.
New Evernote Home for mobile. Did I like it? Well, I have some suggestions
The Evernote mobile apps for Android and iOS have changed a lot over time. But one thing all the versions have in common is the struggle to strike a balance between using the notes we already have and capturing fresh info.
The creation buttons were always there from the very beginning, but eventually, they would be combined with different ways to get to existing notes. Sometimes, they would be more prominent at the bottom or top of the screen, as in the newly released version. Other times, a drop-down or Rolodex-style would take up more screen real estate to make old notes easier to find.
Around version 4 or 5, a star icon was added to the dock for quick access to the Shortcuts, which back then were called Favorites. Variations of the star would exist for numerous subsequent versions, occasionally being eliminated only to be reintroduced. The one I liked the most was a little notch at the bottom of the screen.
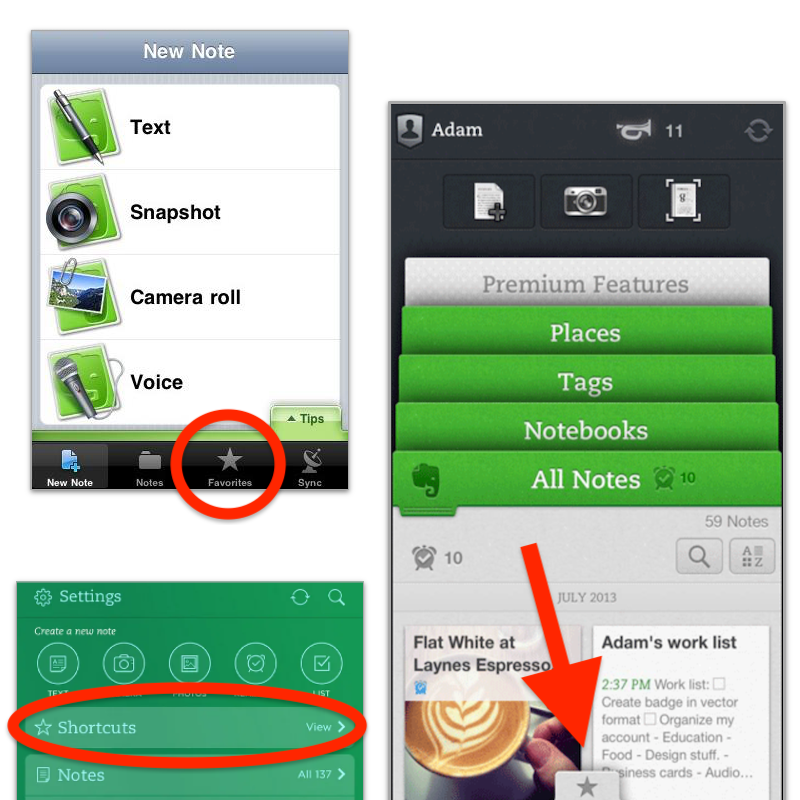
With the introduction of Evernote 7 for iOS, something similar to the current widgets was introduced. Users would be able to select which Rolodex-style cards they’d like to be visible, and sure enough, Favorites was one of the options.
Favorites or Shortcuts were the best way to get to specific notes before Evernote Home existed. But now there’s no quick access to either. Both are two taps away from the new Home screen. So, here’s what I’d like to see improved on this new mobile client.
First, I think we can agree that there’s enough room on that screen for a small star. Regardless of where it is put, we need quick access to a selected group of information in the form of notes, notebooks, etc. Also known as Shortcuts.
I know for a fact that many users love the Scratch Pad. One of my clients even uses it as a way to create all his notes. But I believe there are already enough “creation options” (buttons) on that screen to give advanced users a way to replace the Scratch Pad with another widget. In my case, for example, a Filtered Notes or Pinned Note widget would be of much more value.
Finally, the mobile widgets page settings should be completely independent of the desktop and web clients. As shown in the video below, I still see value on the widgets page, and I came up with a workaround to make it more pleasant to use. However, with quick access to Tasks and Calendar on the dock, there’s no need for these widgets on the old Home anymore. The problem is, if they are removed from there, they will also be removed from the desktop and web clients, where I do need them.
Also regarding settings, I am curious as to why the removal of the Scratch Pad widget from the old widgets page will also remove it from the new Home page.
What about you? Did you like the new Home for mobile? I would love to know your thoughts.
Will I be able to automatically save my Android photos to Apple Photos?
Even though I adore Google Photos and the endless slideshows on the Google displays I have at home and work, I wouldn’t entrust my memories to any one company. That’s why, for a long time, I’ve been using Google Takeout to download a copy of the photos from the previous year to add them to Apple Photos as a backup. The system works, but it’s too manual and prone to mistakes.
Maybe you don’t know this, but even when you use Google Photos to manage the pictures you take, Android will keep a copy of them in the DCIM folder on your phone. And as far as I know, they will not be automatically deleted. To free up space, you must use the cleanup option or manually delete them. But what if I told you that this inconvenience could work in your favor?
The other day, I had one of those click moments that helped me see this issue as a blessing in disguise. Here’s what I’m currently trying to do as I write this post.
Remember Syncthing? I set it up to synchronize the DCIM folder on the Pixel with a folder I created on my Mac. If you don’t know what I’m talking about, please watch the video below explaining how to do it. On it I’m demonstrating how to sync Obsidian, but don’t worry about that. The steps are the same for the DCIM folder.
I am optimistic that this plan will address two issues. The first one is having an easier way to back up my photos, but it will also help me with cleaning up the images that are constantly piling up on my phone. To give you an example, early today, when setting the system up, I discovered 23 GB of old photos and short clips stored on my Android.
It will take a while for all that to be copied to the computer, but the beauty is that Syncthing works both ways. Once the files that have been synchronized with my computer are transferred to Apple Photos and deleted from the folder, they will be automatically deleted on the phone.
This is the very first test I’m doing to make sure Syncthing is correctly transferring everything to the Mac and then deleting the files on the phone when I delete them on the computer. If everything goes well, the next step will be to create an automation to replace the manual process on the Mac side.
This is all for now. When I have further updates about this idea, I’ll publish part two of this article.